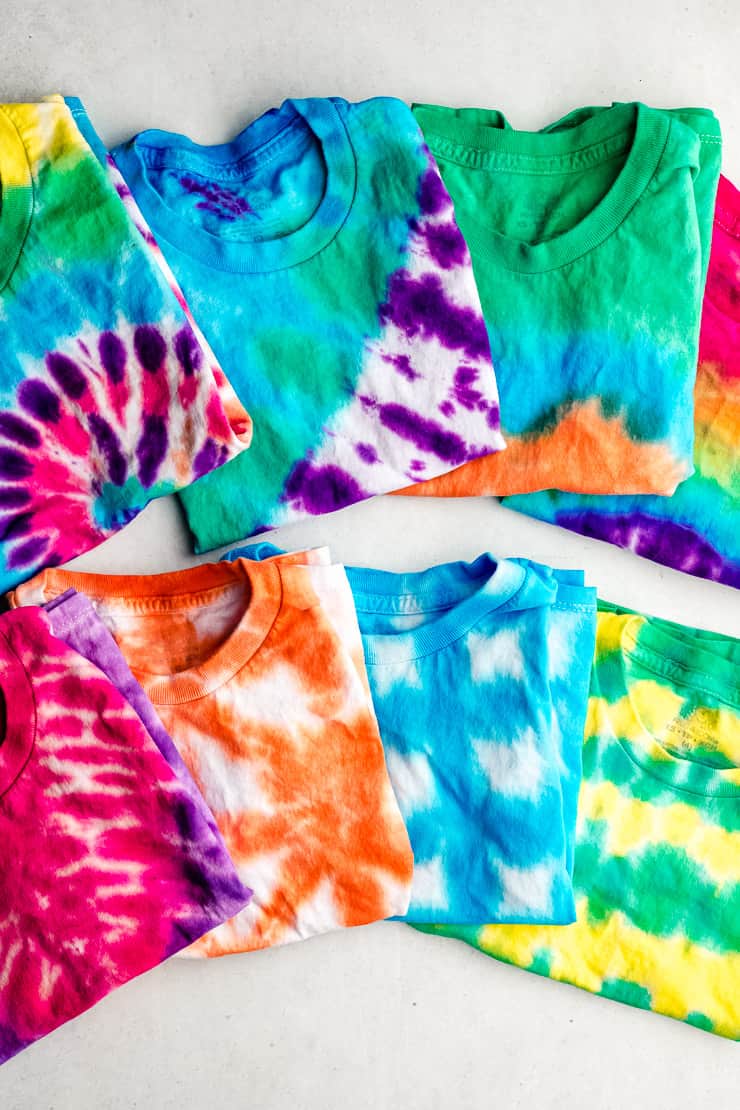
how to make different tie dye designs on shirts
Learn how to make beautiful and unique tie dye patterns with these easy tie dye folding techniques and step-by-step pictures. I'll show you how to make all sorts of tie-dye designs, including the crumple technique, the spiral pattern, and the bullseye design.
Plus, I'll share all of the essential tips and tricks you need to know to get beautiful bright colors and cool designs every time you tie-dye.

About Tie Dye
Tie-dye is a popular fabric dyeing technique known for its bright, saturated colors and bold patterns. It's one of those nostalgic, feel-good crafts that never seem to go out of style.
Tie-dye easy to do, too! To tie dye a shirt, fold up the fabric and secure it with string or rubber bands. Then, apply color by dipping the shirts in buckets of dye, or squirting liquid dye from squeeze bottles.
To learn more about the basics of tie-dye, including how to prep, tie, dye, and wash tie-dyed garments, read my how-to article here: How to Tie Dye.
You can create lots of different patterns by folding and tying the fabric in different ways. The folds, rubber bands, and ties resist the dye, keeping it from saturating the fabric evenly. Any part of the fabric that doesn't get dyed will stay white, creating the design.
Easy Tie-Dye Folding Techniques
In this article, I'll teach you how to tie some of the most popular tie-dye patterns, such as the scrunch or crumple technique, the rainbow swirl pattern, shibori-inspired designs, and more. Here is a list of the tie-dye patterns we'll cover.
- Spiral
- Crumple
- Bullseye
- Sunburst
- Horizontal Stripes
- Diagonal Stripes
- Vertical Stripes
- Box Folds
- Triangle Folds
- Mandala aka Kaleidoscope
- Heart
- Rainbow
- Chevron
- Ombre Dip Dye
- Socks – Stripes
- Socks – Spiral
- Socks – Crumple
- Ice Dye (Bonus!)
Click on the links to jump to a particular design. Or keep reading for all of the tie-dye designs with easy-to-follow instructions and step-by-step pictures.
How to Tie Dye for Beginners
Before we get started, let's quickly review the basics of tie-dye.
- Set up your work area and prepare your supplies.
- Mix your dyes. Pre-soak your garment in soda ash solution, if necessary.
- Fold and tie your garment. (Read more on that below!)
- Apply the dye.
- Let the dye develop.
- Rinse, wash, and dry. Now your garment is ready to wear!
Tie-dye is a pretty easy DIY project, but there are a few tricks you need to know to get the best results. For an in-depth tutorial on how to tie-dye, check out my tutorial, here: How to Tie-dye.
Best Tie Dye Supplies
Good quality supplies can mean the difference between a bright, colorful design and a pale, lackluster design that washes the first time you put it in the laundry.
Dye
The best type of dye to use for tie-dye projects is fiber reactive dye. This type of dye, often called Procion MX dye, is much brighter, longer-lasting, and easier to use than other all-purpose dyes. It is formulated to work with natural fibers like cotton and linen.
For beginners, groups, and kids, I recommend Tulip One-Step Dye kits.
For tie-dyers looking for more color options or a more professional quality dye, I recommend ProcionMX dyes from Jacquard or Dharma Trading Co.
Things to Dye
You can dye all sorts of fabric items, like cotton shirts, sweatshirts, socks, even shoes! Just make sure the items you buy are made with 100% natural fiber (like cotton or linen) for the best result.
Tie-Dye Patterns and Folding Techniques
There are lots of different tie-dye patterns and folding techniques that you can use to create unique designs. Here are a few of the various designs you can create with tie-dye.
1. Spiral or Swirl Tie Dye
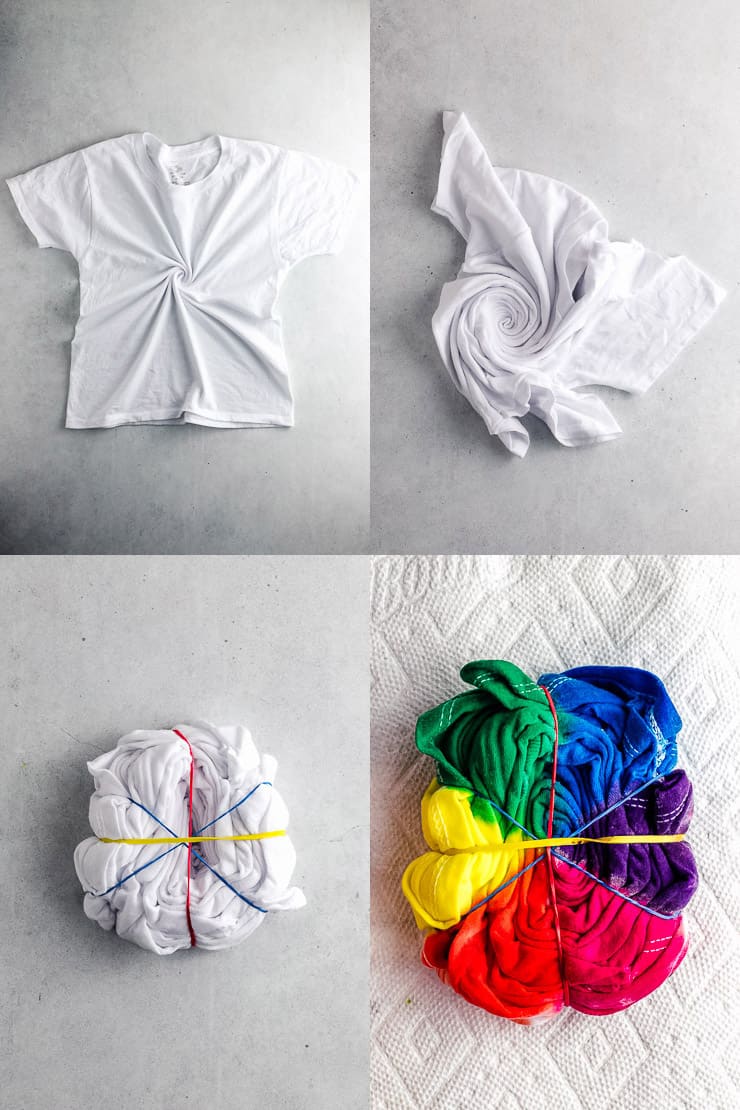

To make a rainbow spiral or swirl tie dye shirt:
- Start by pinching a small section in the center of the shirt. Hold on to that small section while you twist the shirt clockwise.
- Keep twisting, keeping your fingers close to the surface of the table so the spiral stays flat
- As you twist, the shirt will fold in on itself like a flat cinnamon roll.
- Secure the shirt with 3 or 4 rubber bands, crisscrossing them over the center of the disc. The tighter you bind the shirt, the more white areas there will be.
- Apply a different color of dye in each "wedge" created by the crisscrossing rubber bands. Apply the dye in rainbow order to get a rainbow spiral design.
2. Scrunch or Crumple Tie Dye

To make a crumple tie dye aka "scrunch" or "nebula" design:
- First, lay the shirt flat. Then, scrunch smaller sections of the fabric together randomly.
- Keep scrunching and folding, gathering all of the fabric into a relatively flat, tight disk.
- Wrap several rubber bands around the disk. The tighter you scrunch it, the more white areas there will be in the final shirt.
To see a video of the scrunch technique, check out this post: How to Bleach Tie-Dye a Sweatshirt
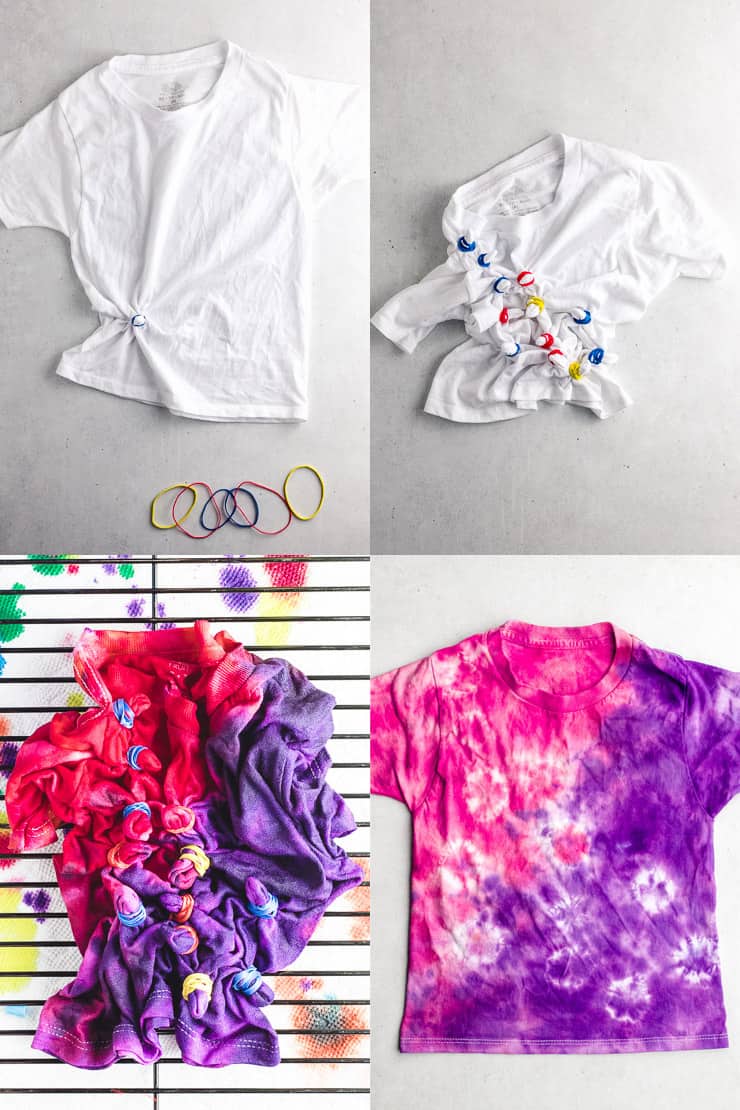
3. Bullseye Tie Dye Pattern


To make a large bullseye design:
- Lay the shirt flat on a table. Pinch a small section of fabric at the center of the shirt. (If you want the bullseye to be off-center, choose a small section off-center.)
- Pull the pinched fabric up to a point, and smooth the rest of the shirt down to create a skinny cone shape.
- Wrap rubber bands around the cone of fabric, starting about an inch below the point of the cone. You can add as many or as few rubber bands as you want.
- To make stripes, apply alternating colors of dye.
4. Sunburst Design
The sunburst design is like a series of small bullseyes. To make the sunburst tie-dye pattern:
- Lay the shirt flat on a table. Pinch a small section of fabric, and pull it up to create a small pointed cone shape.
- Wrap a rubber band around the small cone of fabric, about 1/2 to 1 inch down from the point of the cone.
- Repeat this process, pinching another small section of fabric to create another cone. Secure with a rubber band.
- Make as many sunbursts as you like.
- Apply 1 or 2 colors of dye for the background color.
5. Horizontal Stripes
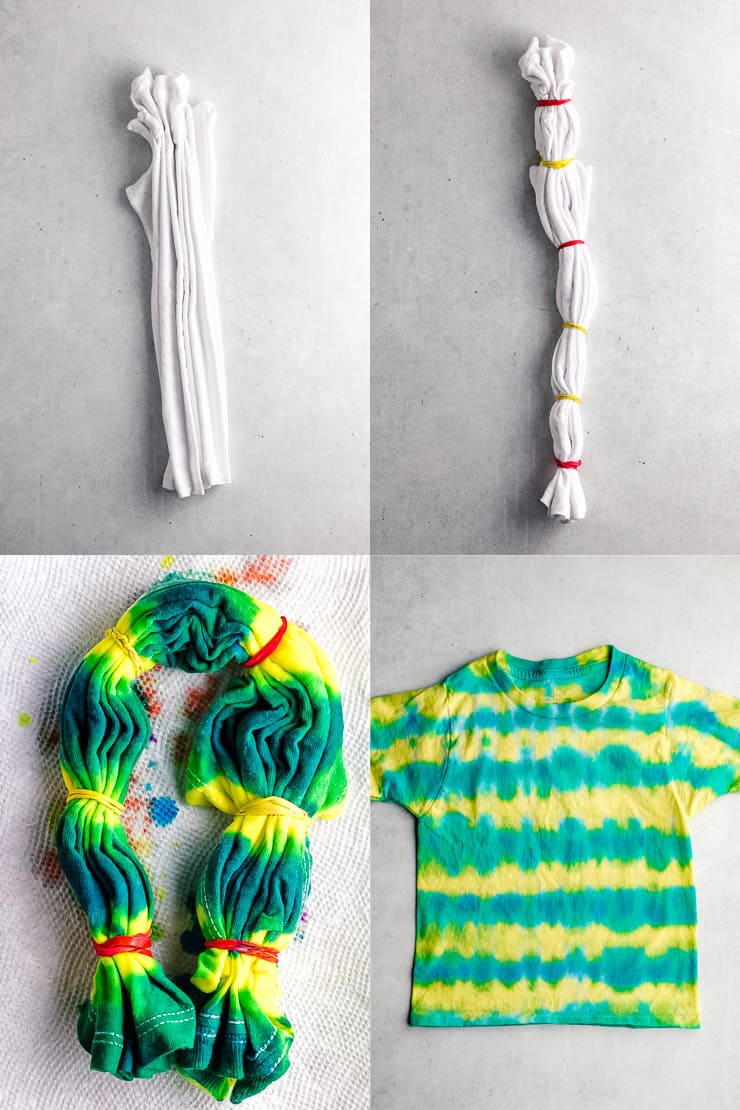
To make horizontal stripes:
- Lay the shirt flat. Starting from the left sleeve, fold the shirt in a series of 1″ accordion folds. Alternate the folds back and forth, like you're making a paper fan.
- Secure the folded shirt with rubber bands, placing a rubber band every 1 to 2 inches.
- To create stripes, apply dye colors in alternating sections.
6. Diagonal Stripes

To make diagonal stripes:
- Lay the shirt flat. Starting from the bottom-left corner, fold the shirt in a series of 1″ accordion folds. Alternate the folds back and forth, like you're making a paper fan.
- Folding the left sleeve can be a little tricky, but try to keep it in line with the rest of the folds.
- Secure the folded shirt with rubber bands, placing a rubber band every 1 to 2 inches.
- To create stripes, apply dye colors in alternating sections. Or, create a color-blocked design like the shirt in the pictures above.
7. Vertical Stripes
Making vertical stripes is very similar to making horizontal stripes. To make vertical stripes:
- Lay the shirt flat. Starting from the bottom hem, fold the shirt in a series of 1″ accordion folds. Alternate the folds back and forth, like you're making a paper fan.
- Secure the folded shirt with rubber bands, placing a rubber band every 1 to 2 inches.
- To create stripes, apply dye colors in alternating sections.


8. Square Box Folds
In the pictures above, reference the diagram on the left and the finished blue shirt. To make shibori-inspired square folds:
- Lay the shirt flat on the table. Starting on the left side, fold the shirt lengthwise in a series of accordion folds. I made each fold about 3.5 inches wide. (You can make wider sections if you like.) Press the edges of each fold well to get sharp creases.
- Next, fold the shirt widthwise in a series of accordion folds. I made each fold about 3.5 inches wide to match. The resulting bundle of fabric should be a square shape.
- Sandwich the fabric bundle between two 3″ squares of cardboard. Secure well with rubber bands.
- You can dip the bundle in a bucket of dye, or use a squeeze bottle to apply dye to the edges of the bundle. (If you use a squirt bottle, make sure to use enough dye to saturate the fabric.)
9. Triangle Folds
This technique starts out the same way as the previous design. In the pictures above, reference the folding diagram on the right and the finished orange shirt. To make shibori-inspired triangle folds:
- Lay the shirt flat on the table. Starting on the left side, fold the shirt lengthwise in a series of accordion folds. I made each fold about 5 inches wide. Press the edges of each fold well to get sharp creases.
- Next, fold the shirt up into triangles. If you've ever folded a flag, this will be familiar. Fold forward up, then back over at a 45-degree angle. Fold forward up again, then back over at a 45-degree again. Repeat until all of the fabric is folded. The resulting bundle of fabric should be a triangle shape.
- Sandwich the fabric bundle between two matching triangles of cardboard. Secure well with rubber bands.
- You can dip the bundle in a bucket of dye, or use a squeeze bottle to apply dye to the edges of the bundle. (If you use a squirt bottle, make sure to use enough dye to saturate the fabric.)
10. Mandala aka Kaleidoscope Tie Dye


For this look, you'll be creating a design with multiple lines of symmetry. To do this, you'll first fold the shirt into a wedge shape and apply the dye in whatever combination you like. Then, when you unfold the shirt, you'll reveal the unique kaleidoscope pattern. To make a tie-dye mandala design:
- Lay the shirt out on the table. Fold it in half lengthwise. Then fold in half again widthwise. The shirt is now folded into quarters.
- Following the diagram above, fold the shirt in half along the diagonal line. The shirt is now folded in eighths.
- Following the diagram above, fold the shirt in half again along the diagonal line. The shirt is now folded into sixteenths.
- Secure with rubber bands.
- Apply the dye in various colors to create your unique design.
11. Heart Tie Dye


With a little patience, you can fold the fabric to create a tie-dye heart in the middle of the shirt. Here's how to make a tie-dye heart:
- First, lay the shirt out flat. Then, fold the shirt in half lengthwise.
- Draw half of a heart shape on the folded edge with a washable marker.
- Starting at one end of your line, begin making small accordion pleats. Follow along the drawn line, folding the pleats in such as way that the marker line appears straight on the top of the folds. This means that you'll be making the pleats a little deeper on the outside section and a little shallower on the inside section to accommodate the curve of the line.
- When all of the fabric has been pleated, secure it with a thick rubber band. Put a runner band on the line itself, and add more rubber bands on the inside or outside sections as desired.
12. Rainbow Tie Dye


Folding a rainbow shape is very similar to folding a heart – but even easier! Here's how to make a tie-dye rainbow shape:
- First, lay the shirt out flat. Then, fold the shirt in half lengthwise.
- Draw half of a rainbow arch on the folded edge with a washable marker.
- Starting at one end of your line, begin making small accordion pleats. Follow along the drawn line, folding the pleats in such as way that the marker line appears straight on the top of the folds. This means that you'll be making the pleats a little deeper on the outside section and a little shallower on the inside section to accommodate the curve of the line.
- When all of the fabric has been pleated, secure it with a thick rubber band. Put a runner band on the line itself, and add more rubber bands on the inside or outside sections as desired.
- Apply the dye in rainbow order to create a traditional rainbow color scheme.
13. Chevron Tie Dye

This chevron design is a variation of the diagonal stripe designs that we learned above. Here's how to make a tie-dye chevron:
- First, lay the shirt out flat. Then, fold the shirt in half lengthwise.
- Draw half of a chevron V-shape on the folded edge with a washable marker. You can position it higher or lower than mine, or make it pointing upward or downward – your choice.
- Starting at one end of your line, begin making small accordion pleats. Follow along the drawn line, folding the pleats in such as way that the marker line appears straight on the top of the folds.
- When all of the fabric has been pleated, secure it with a thick rubber band. Put a runner band on the line itself, and add more rubber bands on the inside or outside sections as desired.
- For a color-blocked look, add 1 or two colors of dye. For a striped chevron look, apply dye in small sections, alternating colors.
14. Ombre Dip Dye
For this technique, you don't have to fold the fabric – though I think it would look really awesome with some thin accordion folds! To make an ombre dip dye design:
- Dip one end of the shirt into a bucket of dye. As it sits in the dye bath, the dye will slowly work its way up the fabric.
- You can repeat this process by dipping the other end of the fabric into a different color of dye.

15. Striped Tie Dye Socks
Tie dying socks is very similar to shirts – you just have a smaller canvas to work with. To create a pair of matching tie-dye striped socks:
- Lay two socks together, and fold in half lengthwise.
- Place a rubber band every inch or two down the length of the socks.
- Apply a different color of dye in each section.
16. Swirl Dye Socks
Since socks don't have lot of surface area, it's hard to get a true spiral. Even so, I really like the design that this technique makes. To make swirl tie dye socks:
- Lay two socks together. Pinch a small section in the heel area, and twist. Keep twisting until the socks coil up on themselves, like a cinnamon roll.
- Secure with rubber bands. Add different colors of dye to the "wedges" that are formed by the crisscrossing rubber bands.
17. Crumple Dye Socks
Here's the easier way to dye socks. You can dye them as a pair, or as singles. To make crumple dye socks:
- First, lay the socks flat. Then, scrunch small sections of the fabric together randomly.
- Keep scrunching and folding, gathering the socks into a relatively flat, tight disk.
- Wrap several rubber bands around the disk. Apply the dye in the colors of your choice.
Bonus: Ice Dye

Ice dying is a fun and cool variation on traditional tie-dying techniques. I love it for the way it creates stunning watercolor designs. Instead of liquid dye and squeeze bottles, ice tie dye uses powdered dye sprinkled over a pile of ice cubes. To learn more about this magical technique, click here: How to Ice Dye – Easy DIY Tutorial
And of course, you can use a lot of these folding techniques for bleach tie-dying. To learn more about that process, don't miss my articles about How to Bleach Tie-Dye a Sweatshirt and 5 Folding Techniques for Bleach Tie Dye.
What's Next?
Pin this post: Save this tutorial to your Pinterest boards so that you can come back to it later.
Leave a comment: I love to hear your feedback. Tell me in the comments below!
Share on Instagram or Facebook: When you make this project, share it on social media and tag me @sarahmaker. I love to see what you make!
Have questions? Join the Facebook Group!
I hope this article was useful for you! If you have any additional questions, feel free to join my Facebook Group. I created this group for you to share pictures, ask questions, and help each other out.


Sarah Stearns has helped thousands of makers find their next craft project with free patterns and step-by-step tutorials on her blog, sarahmaker.com. Read more.
Her work has been featured in Scientific American, Good Housekeeping, Vox, Apartment Therapy, and more.
how to make different tie dye designs on shirts
Source: https://sarahmaker.com/tie-dye-patterns/
0 Response to "how to make different tie dye designs on shirts"
Post a Comment