How to Upload to Youtube From Photos Windows 10
On Windows 10, Photos is an essential app designed to help you lot to organize your pictures and videos. Using the app, you lot tin can view your media files. Y'all tin can edit them, and easily share those memories with family and friends.
Still, the Photos app is more than just an experience to organize your digital memories, as information technology as well includes a powerful video editor similar to the legacy Windows Pic Maker, which you can use to create videos automatically, or from scratch with music, text, and motion, and mod features, such as 3D effects.
In this Windows x guide, we'll walk y'all through the steps to get started creating videos using the Photos app. This guide outlines all the steps yous need to know, from creating a video automatically to creating and editing a projection from start to finish.
- How to create video automatically using Photos
- How to create video project manually using Photos
- How to edit video project using Photos
- How to add 3D effects video projection using Photos
- How to backup video projection using Photos
How to create video automatically using Photos
The Photos video editor allows you lot to create video projects from scratch, or you tin can select the media elements to permit the editor create a video automatically.
To create a video automatically using the Photos app, use these steps:
- Open Photos.
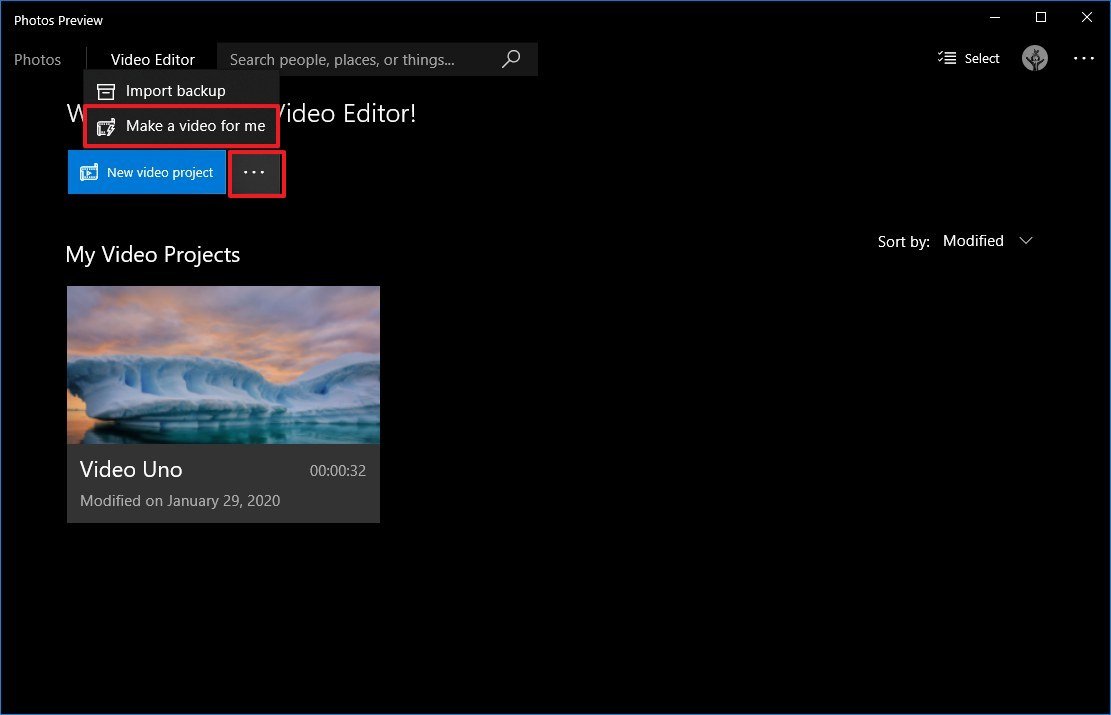
- Click the Video Editor tab.
-
Click the menu (three-dotted) button adjacent to the New video project button, and select the Make a video for me option.
 Source: Windows Cardinal
 Quick tip: You can also start a new automated video project from the Photos habitation past clicking the New video option from the top-right, and selecting the Automated video option.
-
Click the Make a video for me choice.
 Source: Windows Central
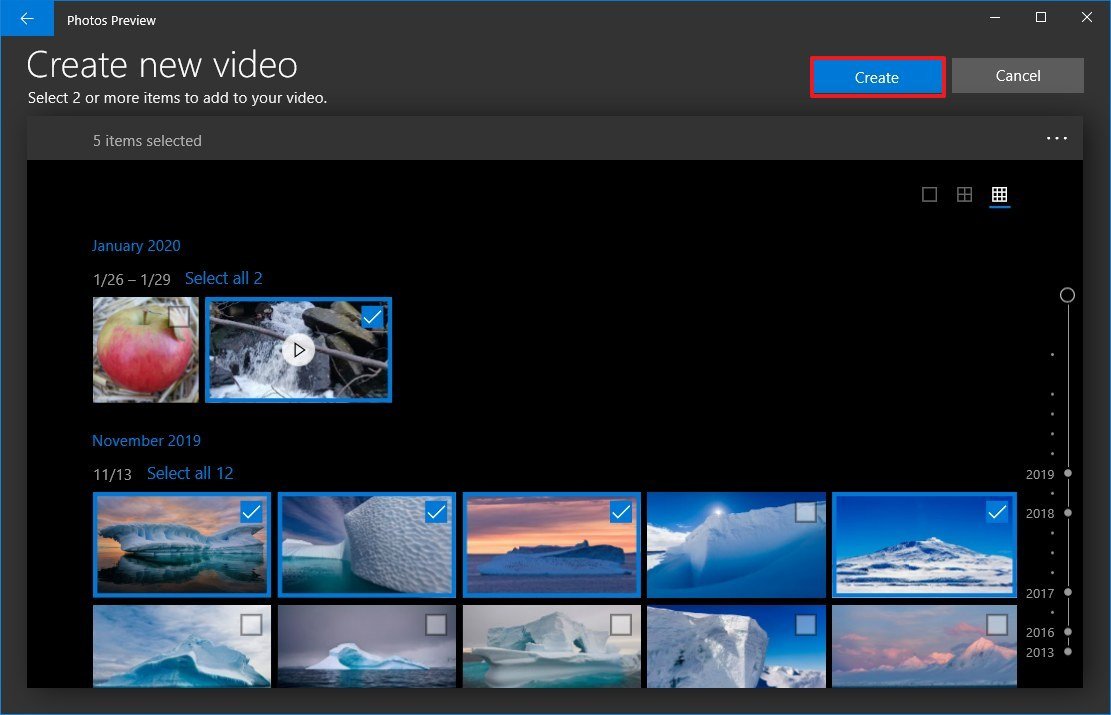
 - Select the videos and images for the projection.
-
Click the Create button.
 Source: Windows Central
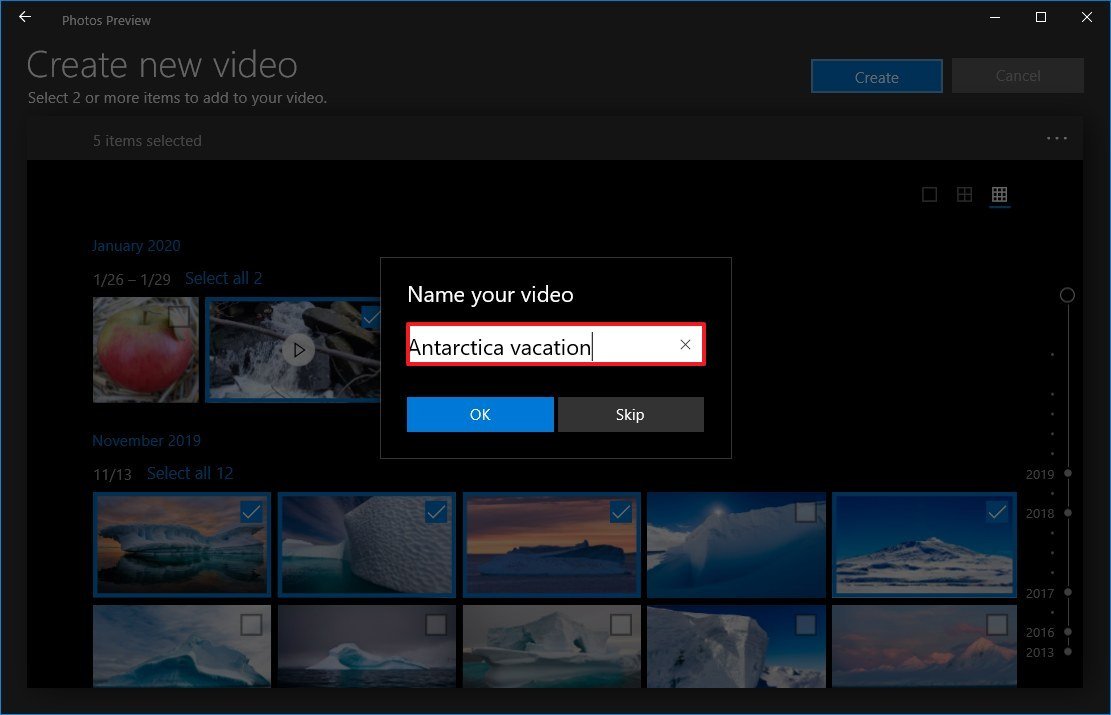
 - Specify a descriptive proper noun for the projection.
-
Click the OK push.
 Source: Windows Fundamental
 -
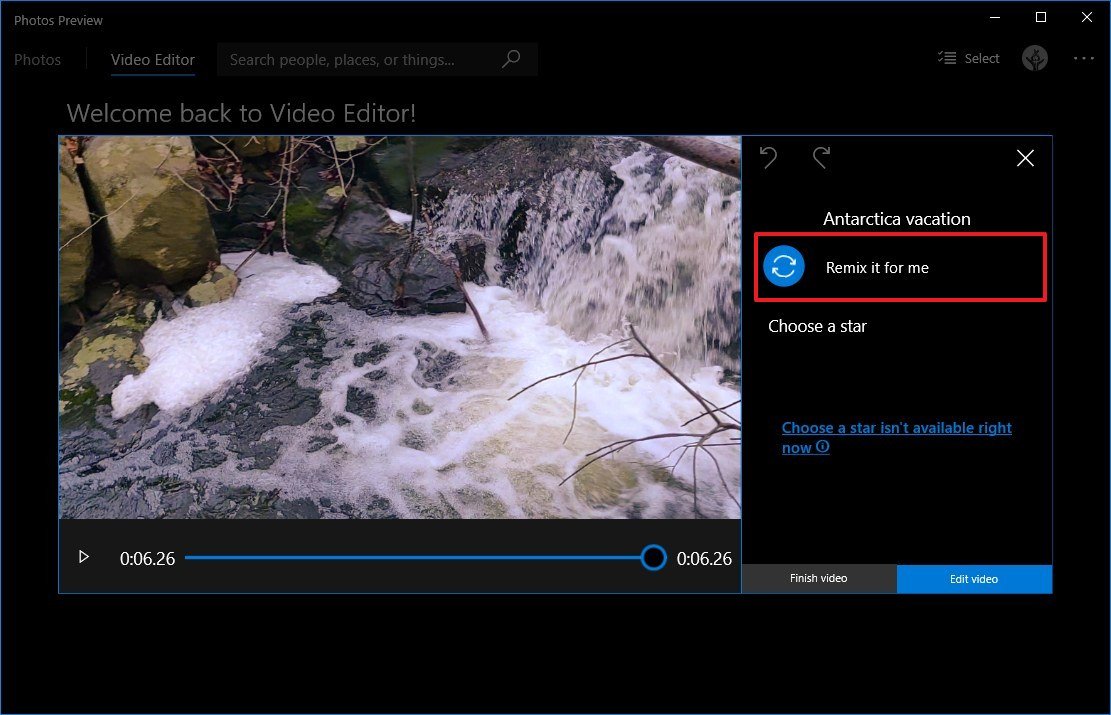
(Optional) Click the Remix it for me push button to change the theme.
 Source: Windows Cardinal
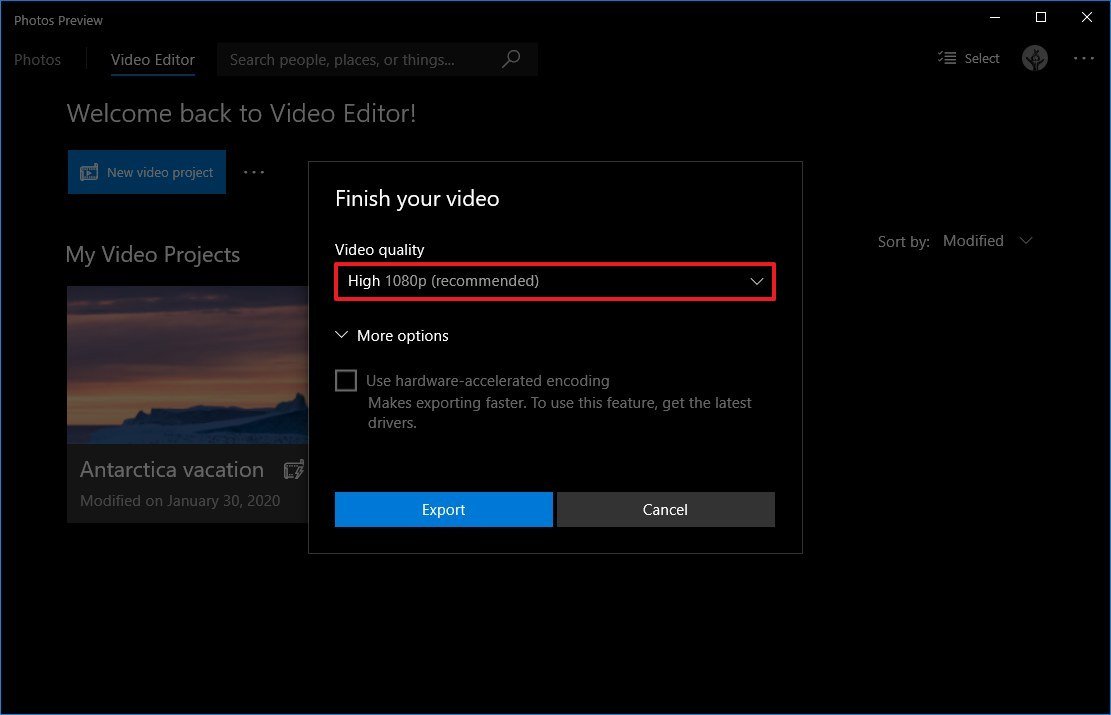
 - Click the End video button.
-
Employ the "Video quality" drop-down carte du jour and select the quality of the video (High 1080p, Medium 720p, or Low 540p).
 Source: Windows Central
 Quick tip: The lower the quality, the lower the quality of the video volition be, only information technology'll require less space, which tin can also make it easier for sharing.
- Check the Use hardware-accelerated encoding option (if applicative).
- Click the Export push button.
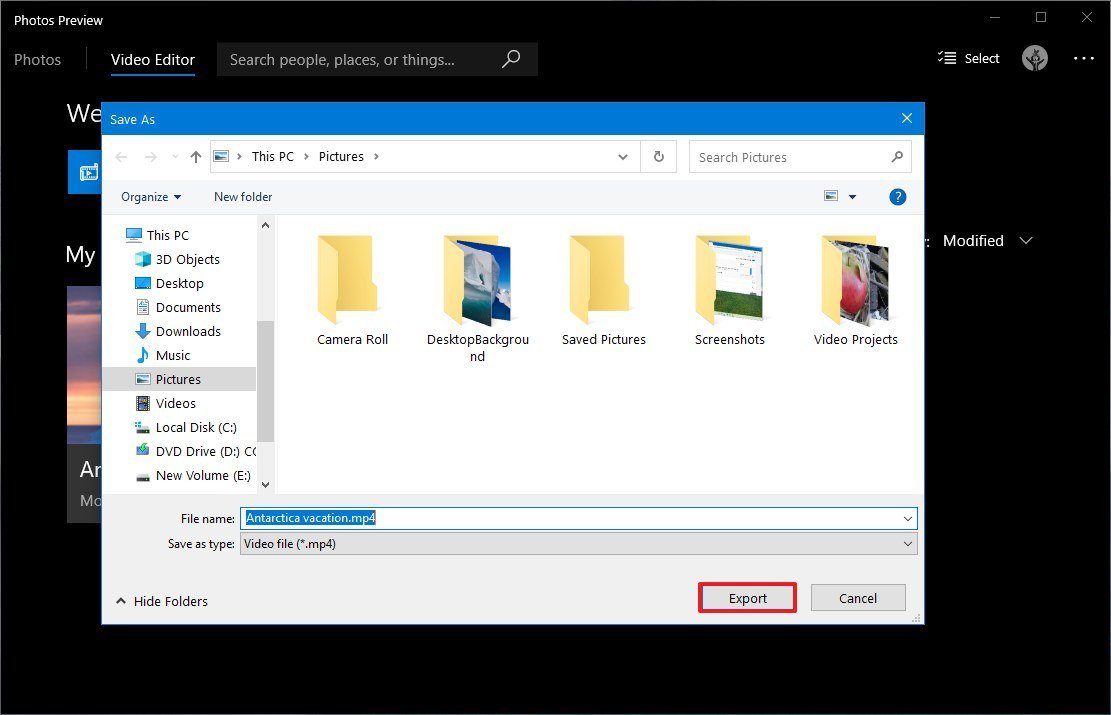
- Select a binder to save the video project as a .mp4 file.
-
Click the Export button.
 Source: Windows Cardinal


Once you complete the steps, the video volition be created and exported, and yous tin can now play information technology with whatever device that supports MP4 playback. Or you lot can share it with anyone using email, social media, or you tin even upload it to YouTube for the world to run across your creation.
How to create video project manually using Photos
To create a video projection from scratch using the Photos app, use these steps:
- Open Photos.
-
Click the Video Editor tab.
Source: Windows Central -
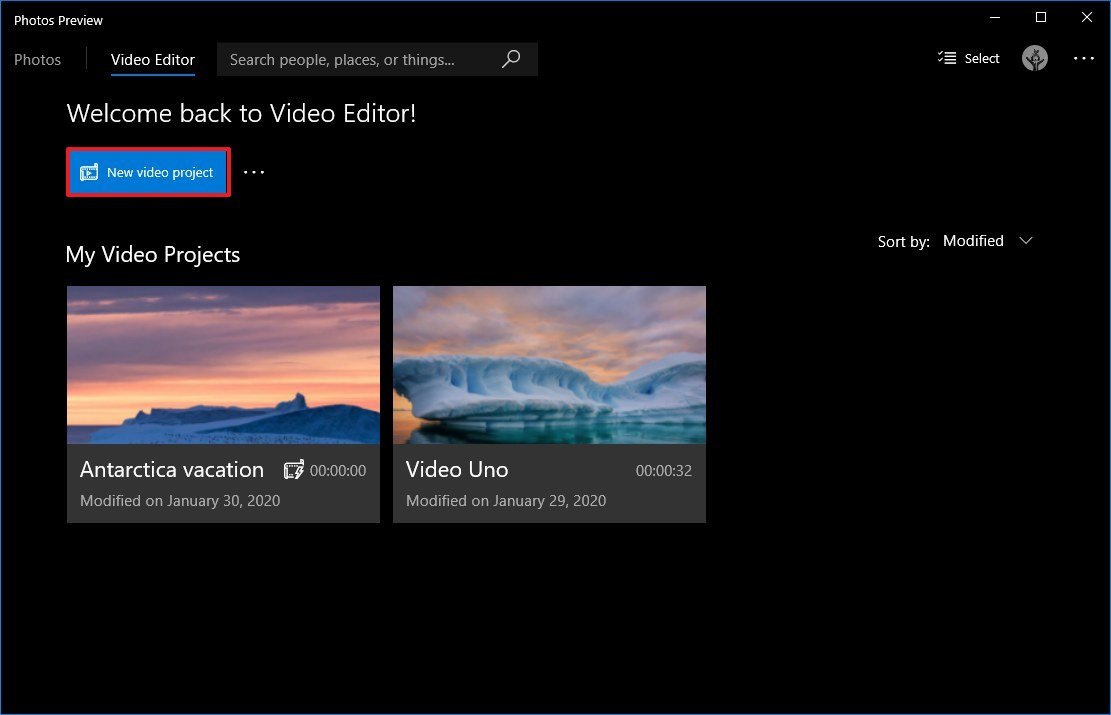
Click the New video project button.
 Source: Windows Central
 - Specify a descriptive name for the project.
- Click the OK button.

After yous consummate the steps, you can beginning calculation content to the storyboard to keep editing the projection with various options, including text, duration, motion, 3D effects, and more. The video editor also has a live preview that you can apply to check the process before exporting the video.
How to edit video project using Photos
In one case you created a new project, you'll be presented with the video editor experience, which is made upwards of three main sections. Yous accept the "Project library" at the top-left side, which is the place where yous'll add the images and videos that y'all'll exist using in the project.
At the bottom, yous'll find the "Storyboard" section, which is where you can drag and drop the media elements to build your video. Besides, depending on the content you lot're editing, you'll get a different fix of features you lot can use to edit.
On the height-right side, you tin preview your project with all the electric current changes, and as you play the video, you lot'll see the timeline highlighting the card being played.
Calculation media elements
To add new media files to the video project, apply these steps:
- Under the "Project Library" section, click the Add button in the top-left corner.
-
Select the From my drove option.
 Source: Windows Central
 Quick note: The video editor also allows you to import files that are non function of the Photos app, such as from an external drive, using the "From this PC" pick, and you tin can fifty-fifty use the "From the spider web" pick to download images from Bing.
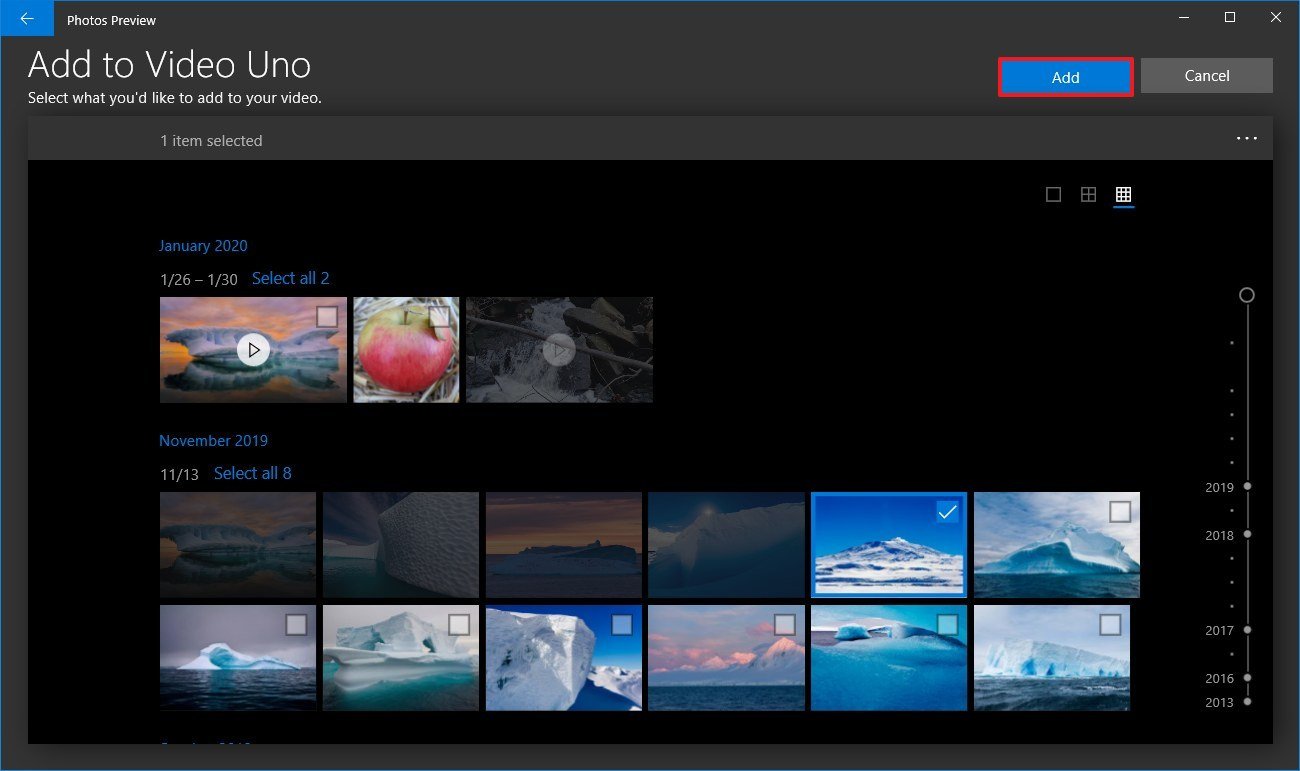
- Select the pictures and videos you want to be office of the project.
-
Click the Add push from the meridian-right corner.
 Source: Windows Central
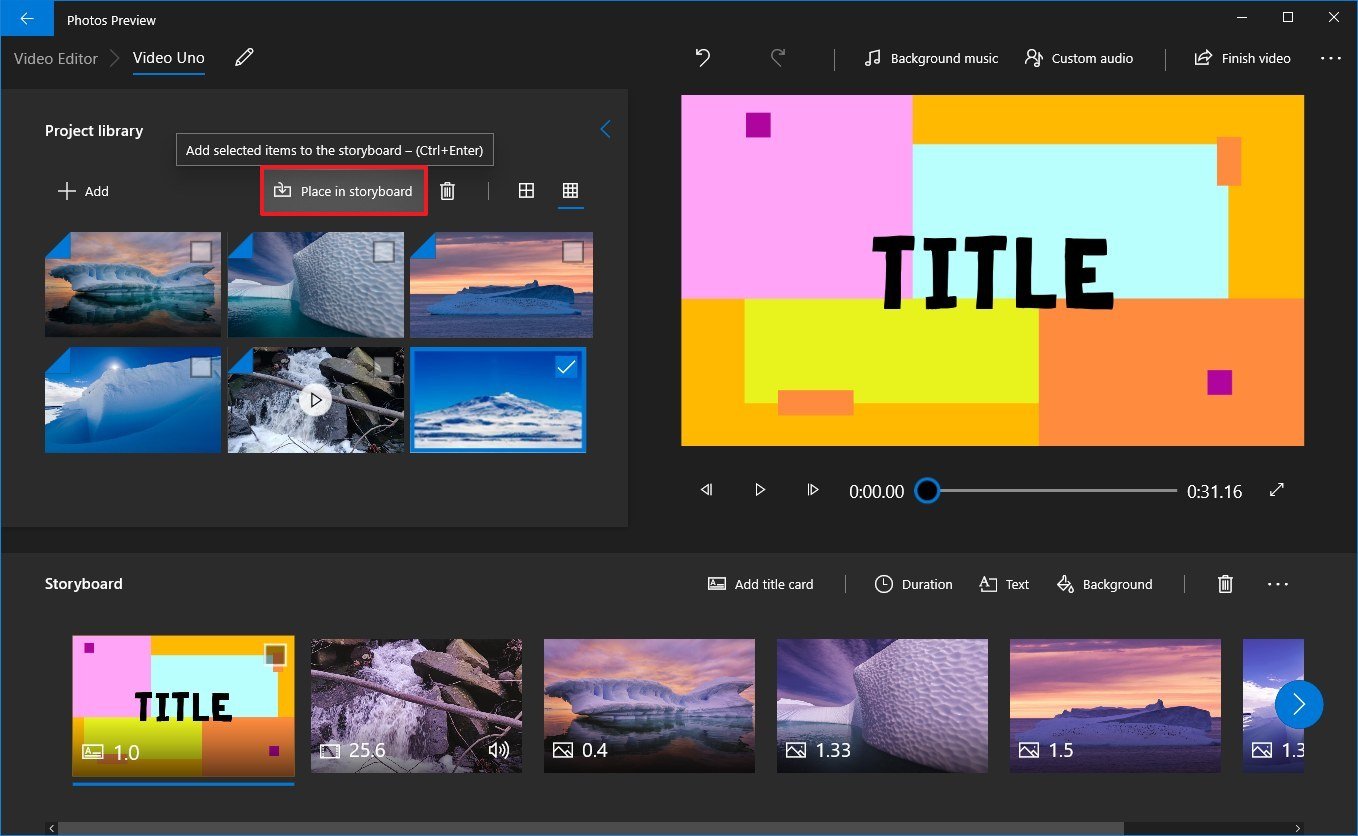
 - Check the media elements to begin your video.
-
Click the Identify in storyboard button. (You lot can besides elevate-and-drib the files to the storyboard.)
 Source: Windows Central


While editing a video, you lot can ever add together more media files, clicking the Add button, and you can remove files by selecting the items and clicking the Trash button from the top-right.
Adding elapsing
As you add media to the storyboard, you'll detect that every file includes a default time duration. If you desire the media to take a shorter or longer menstruum, employ these steps:
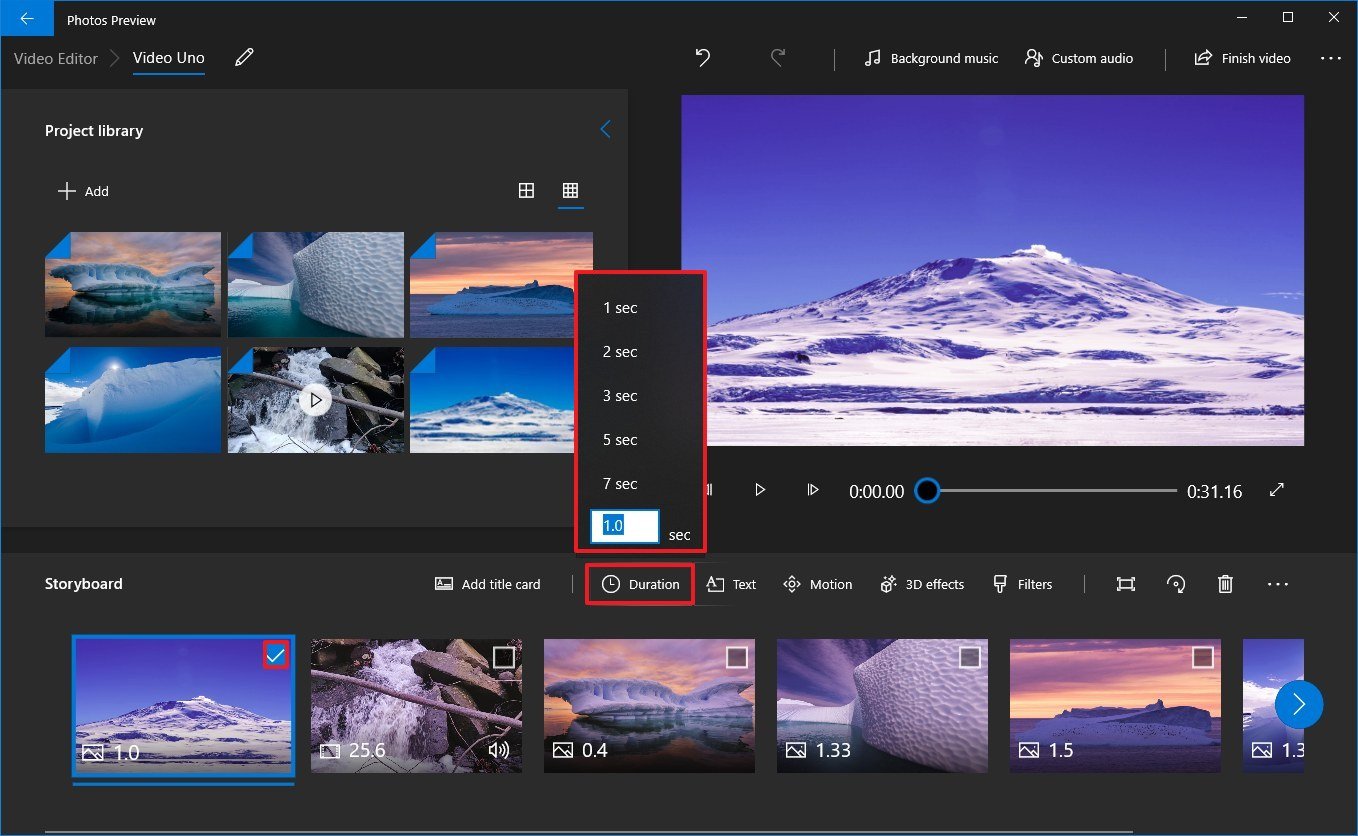
- Under the "Storyboard" section, select the media element (or elements).
- Click the Elapsing push button from the toolbar.
-
Select a fourth dimension duration, or specify a time range in seconds.
 Source: Windows Central

After you complete the steps, the element will play in the video the fourth dimension y'all specified. If you have multiple elements in the storyboard, you may need to repeat the steps to modify the elapsing for the remaining items.
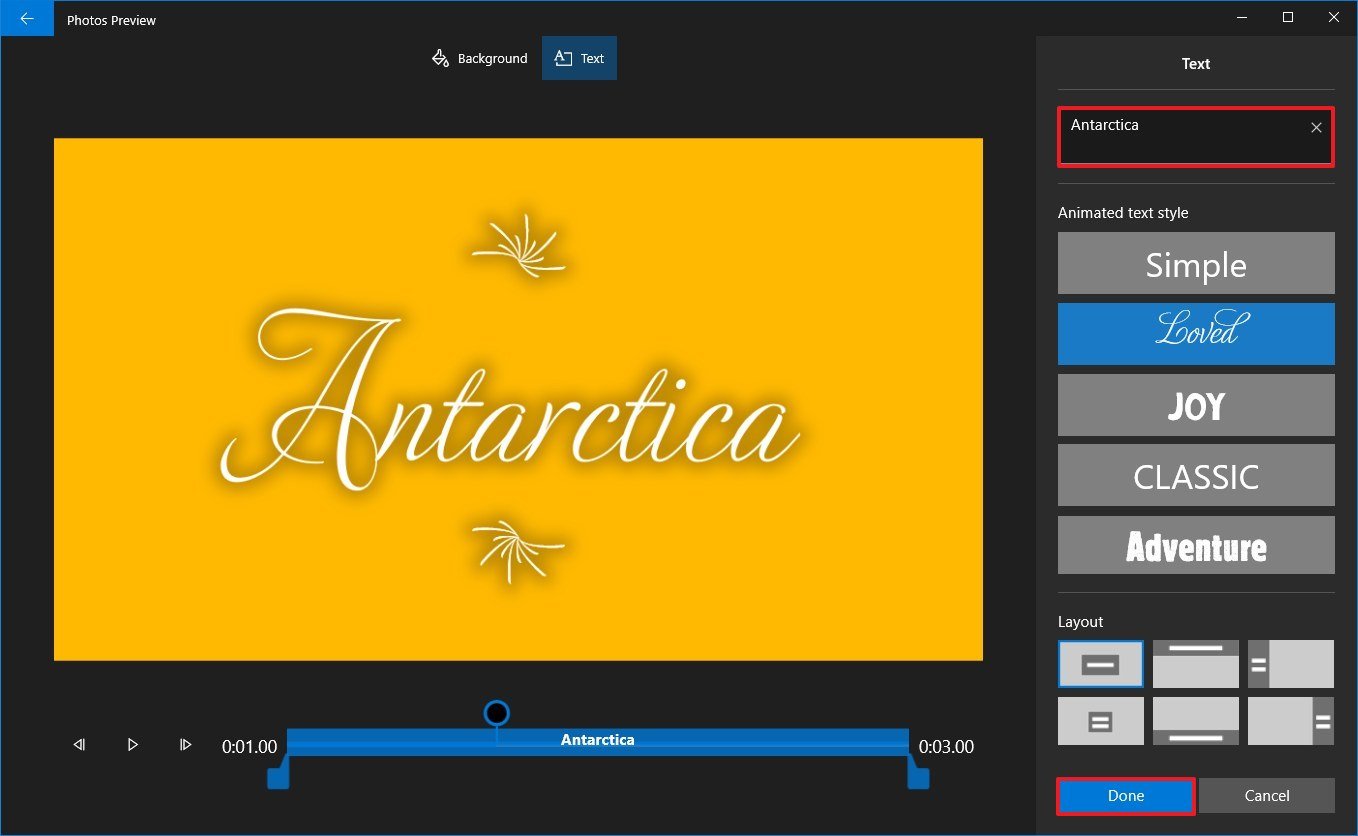
Adding text
Y'all tin also add together a custom championship or caption to an image or video using these steps:
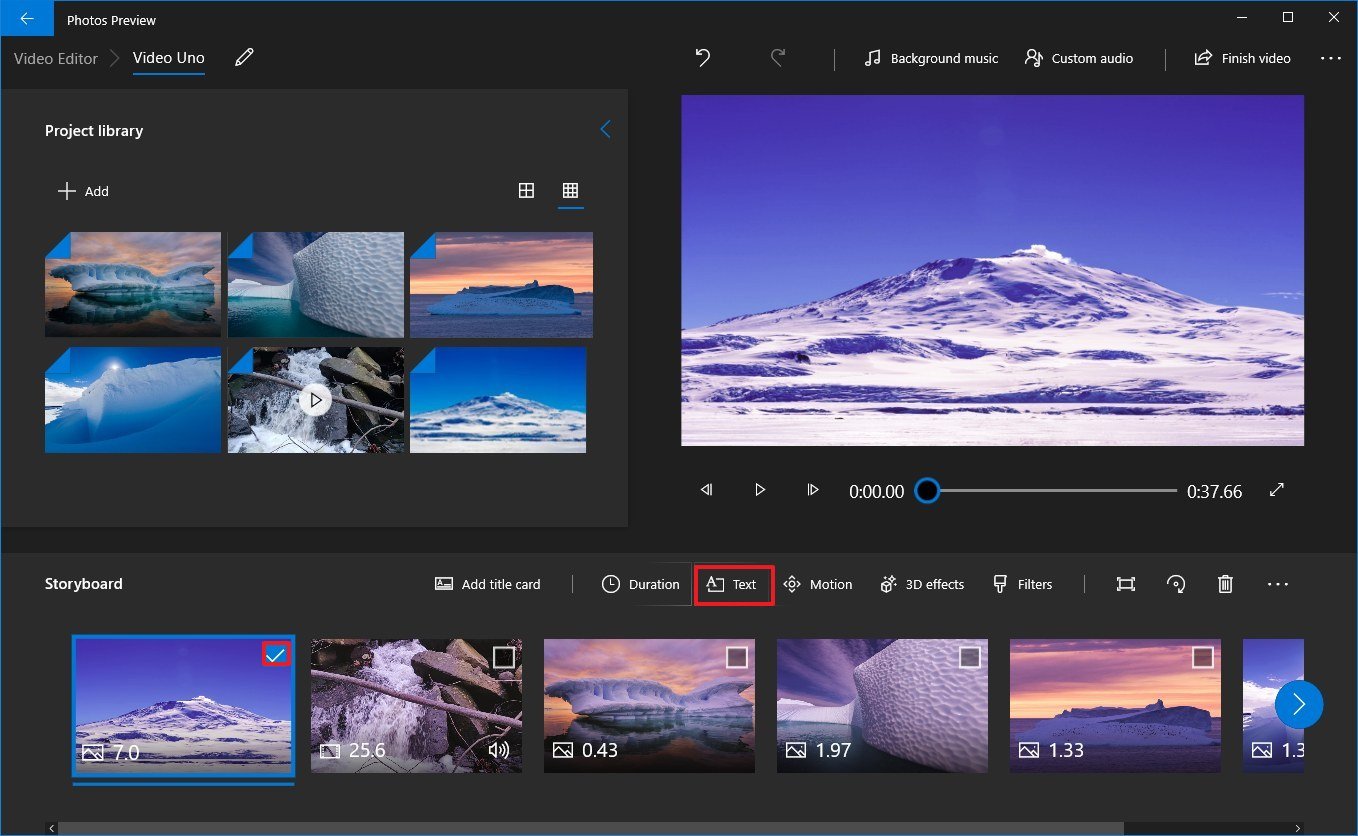
- Under the "Storyboard" section, select the media element.
-
Click the Text button from the toolbar.
 Source: Windows Central
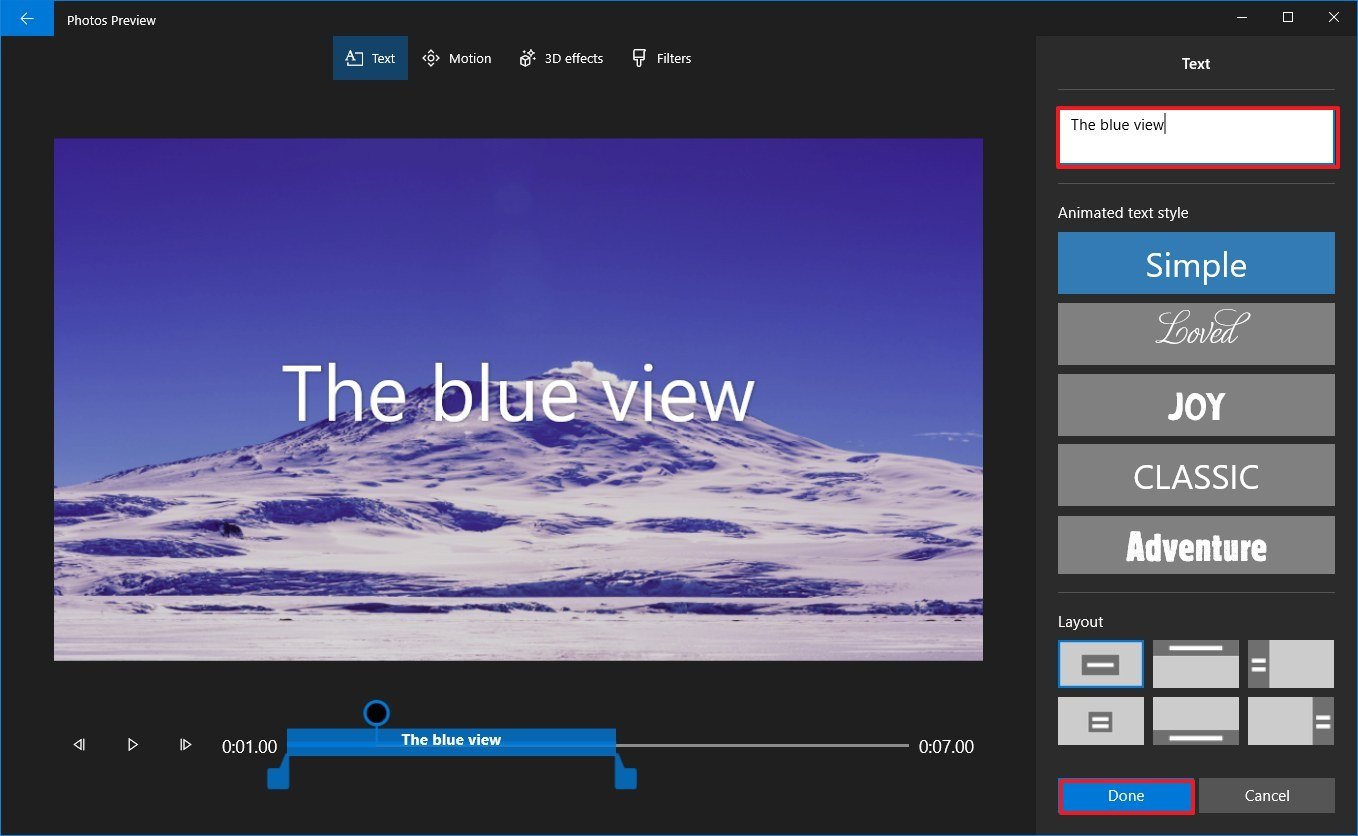
 -
Use the Text box to insert custom text.
 Source: Windows Central
 - Select the text way from the list.
- Select the location using the Layout options.
- Use the controls on the left side to specify the text duration and preview the changes.
- Click the Done button.


Once you consummate the steps, the text will apply to the chemical element for the time you specified.
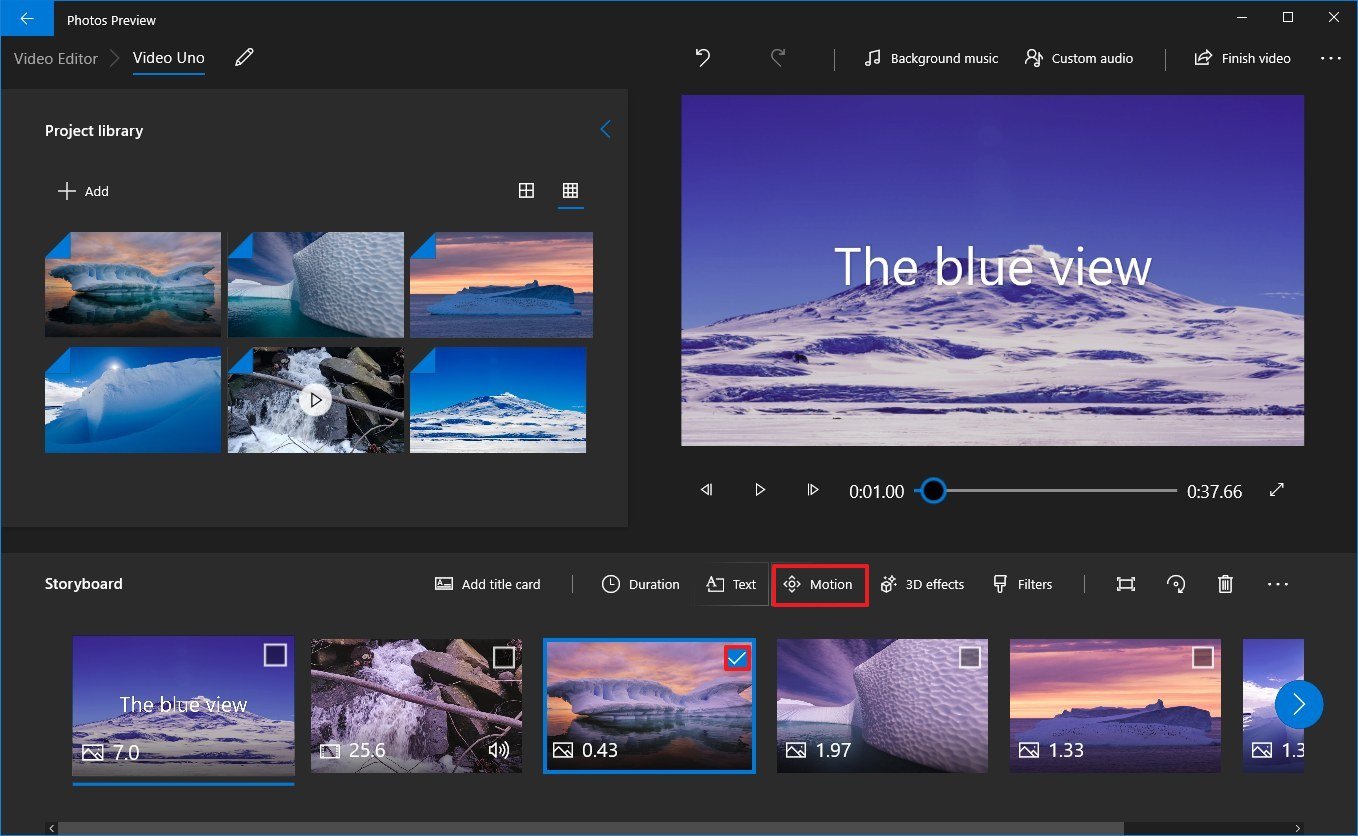
Calculation move
The video editor in Photos besides lets you add camera motion styles to images and videos with these steps:
- Under the "Storyboard" section, select the media element.
-
Click the Motion button from the toolbar.
 Source: Windows Cardinal
 -
Select a motion effect for the epitome or video, such as Zoom in center, Zoom in right, Pan left, Tilt up and others.
 Source: Windows Primal
 - Use the controls on the left side to preview the changes.
- Click the Done push.


After you complete the steps, you may need to repeat the steps to apply the aforementioned or different motion result to other parts of the video.
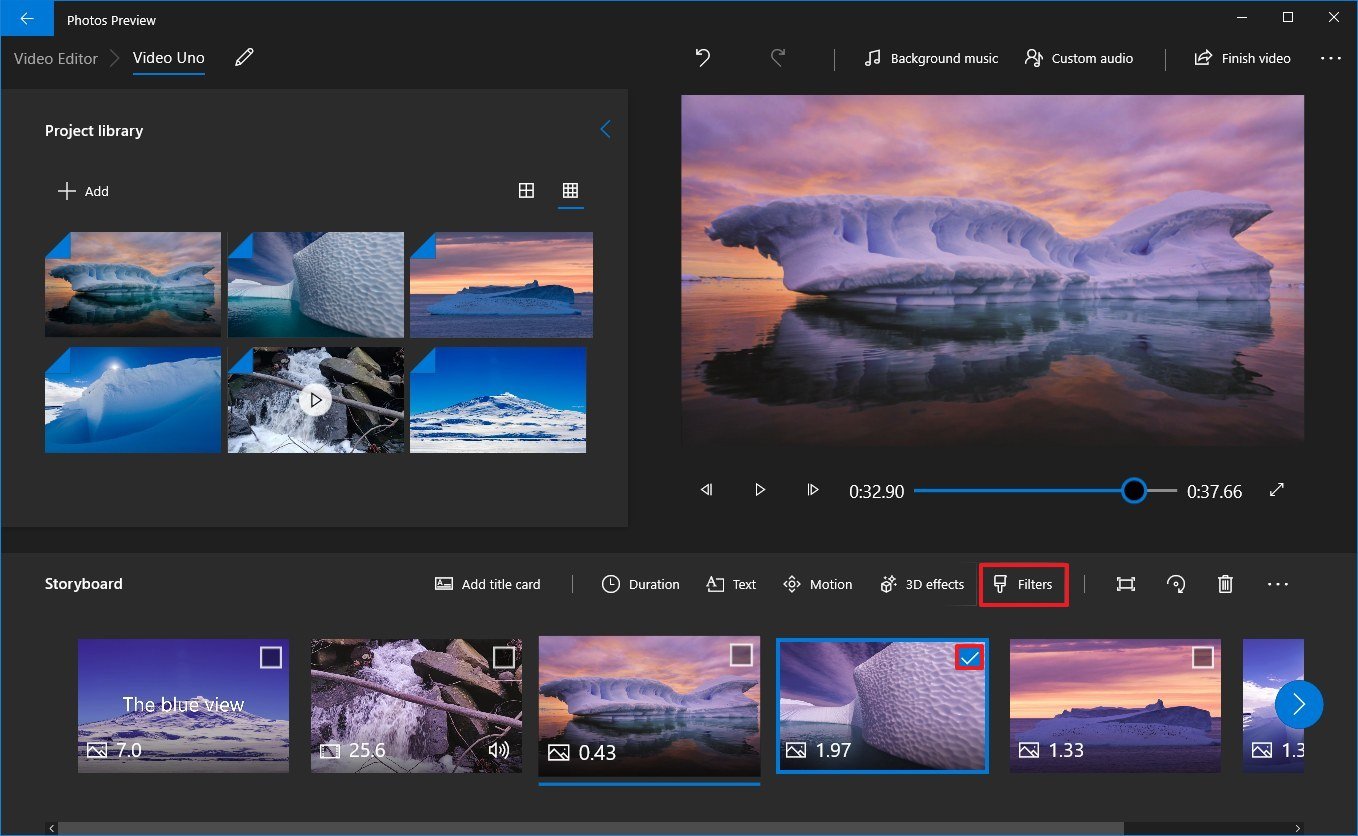
Calculation filters
Using the video editor, you lot tin can fifty-fifty add filters to change the look of the images or video clips in your projection using these steps:
- Under the "Storyboard" section, select the media element.
-
Click the Filters button from the toolbar.
 Source: Windows Central
 -
Select one of the 14 filters bachelor, such as Classic, Adventure, Sepia, Inky, Loved, Pixel, etc.
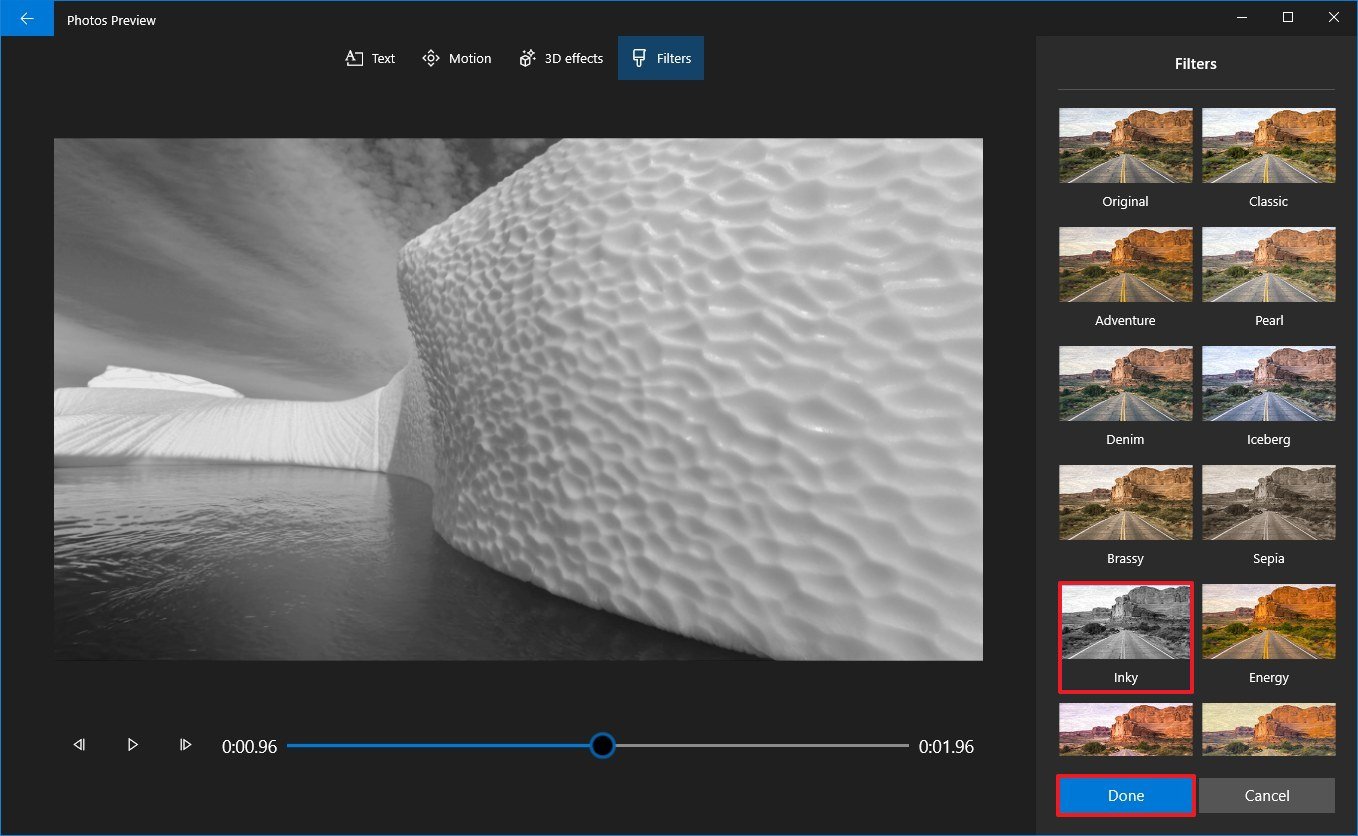 Source: Windows Central
 - Apply the controls on the left side to preview the changes.
- Click the Done button.


Later you complete the steps, the filter will apply for the media file. If you have multiple parts of the project to use a specific filter, you lot'll need to echo the steps for each chemical element.
Adding trim, split, speed
The Photos app editor also includes the ability to trim, split up, and control the speed of a video clip.
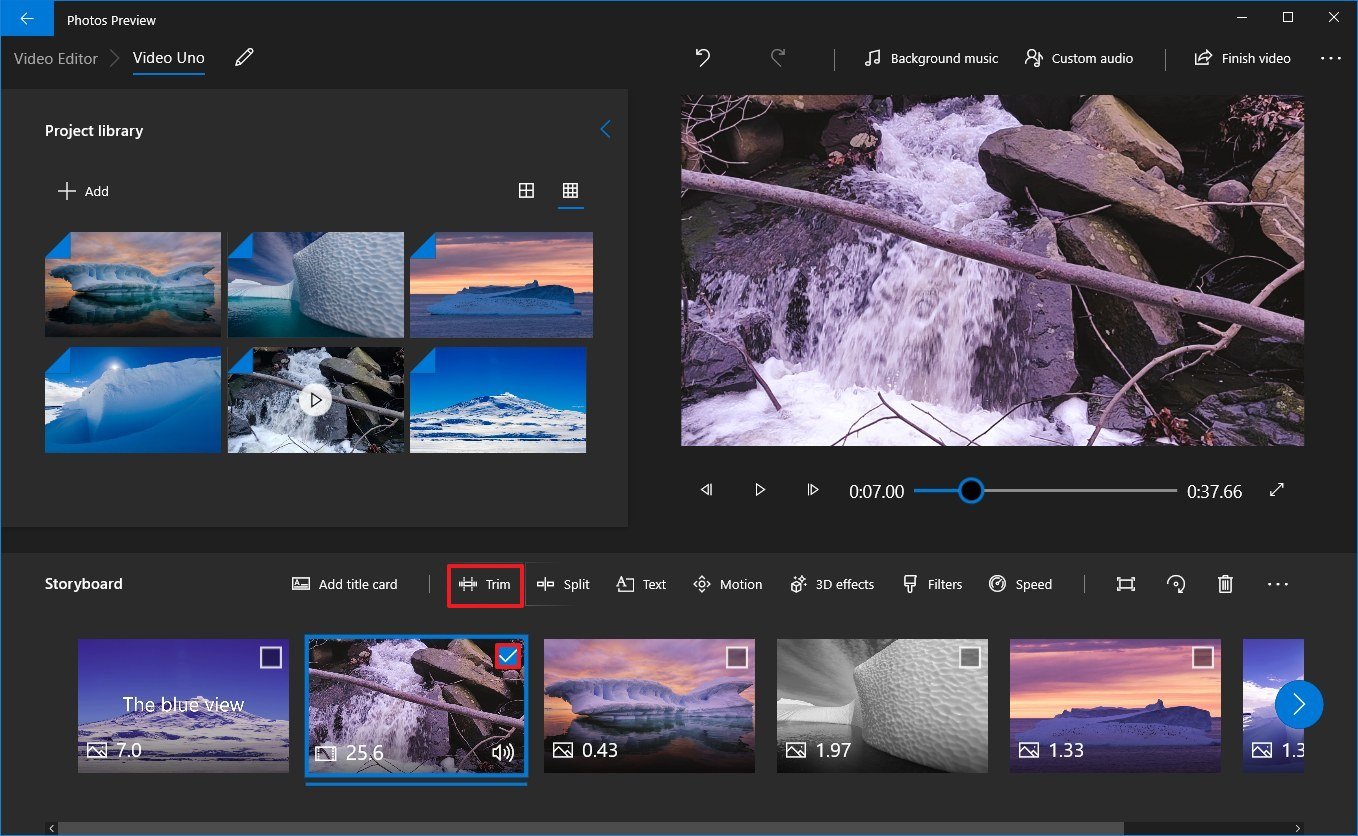
Trimming
To trim a video with the Photos app editor, use these steps:
- Under the "Storyboard" section, select the video prune.
-
Click the Trim push from the toolbar.
 Source: Windows Key
 -
Utilize the controls to cull the trim section.
Quick tip: When inserting a video prune to the storyboard, it'll not play the full length. If you want to include the entire video, y'all need to select the whole length using the trim option.
- Click the Done button.

Once you consummate the steps, only the video selection you specified will be included in the projection.
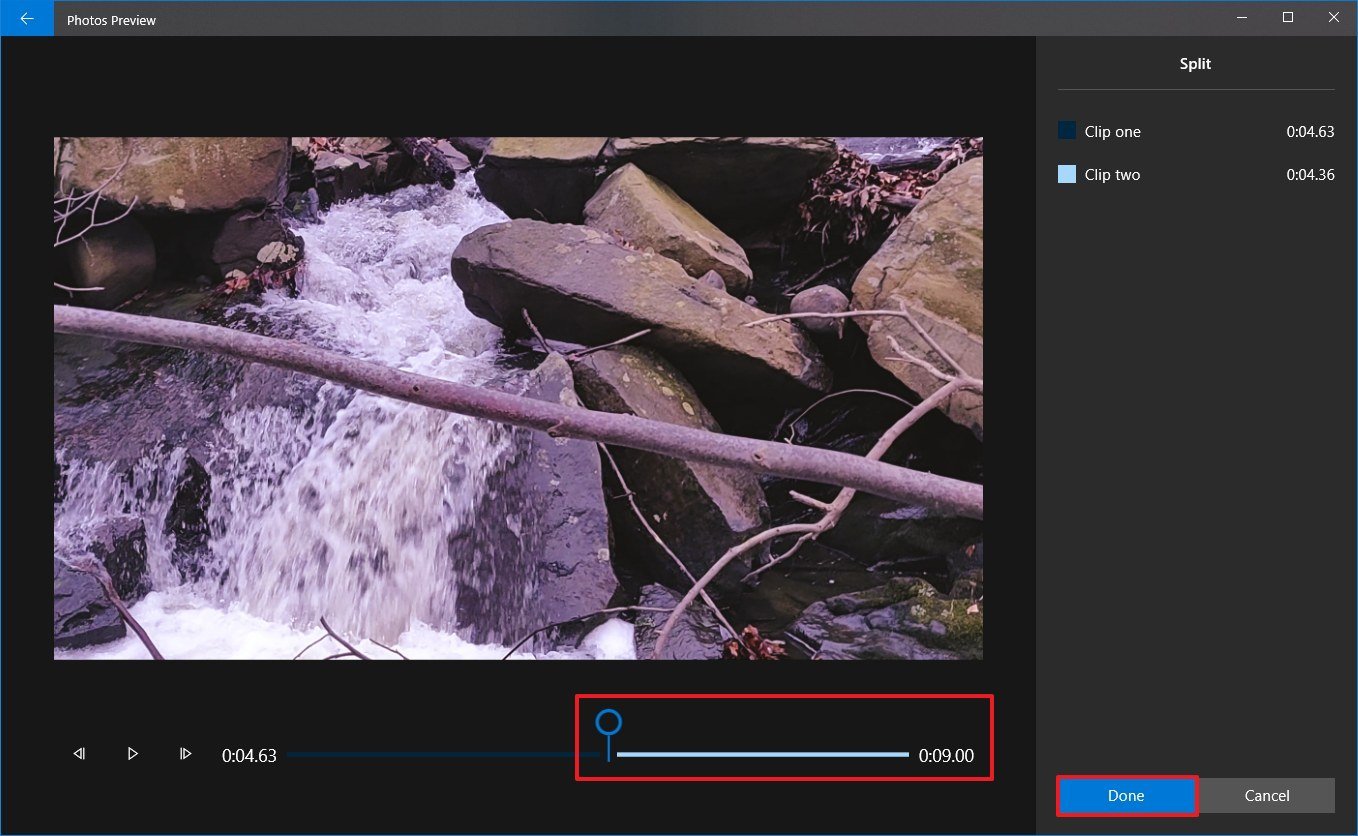
Splitting
To split a video clip into ii or more parts with the Photos app, use these steps:
- Nether the "Storyboard" section, select the video clip.
-
Click the Dissever button from the toolbar.
 Source: Windows Fundamental
 -
Employ the slider to cull the length of the clip.
 Source: Windows Central
 -
Click the Done push button.
Quick tip: If you lot want to separate the video in multiple clips, repeat steps No. five through seven.


After you consummate the steps, you'll end up with a video divided into multiple parts. (This option will non modify the original video.)
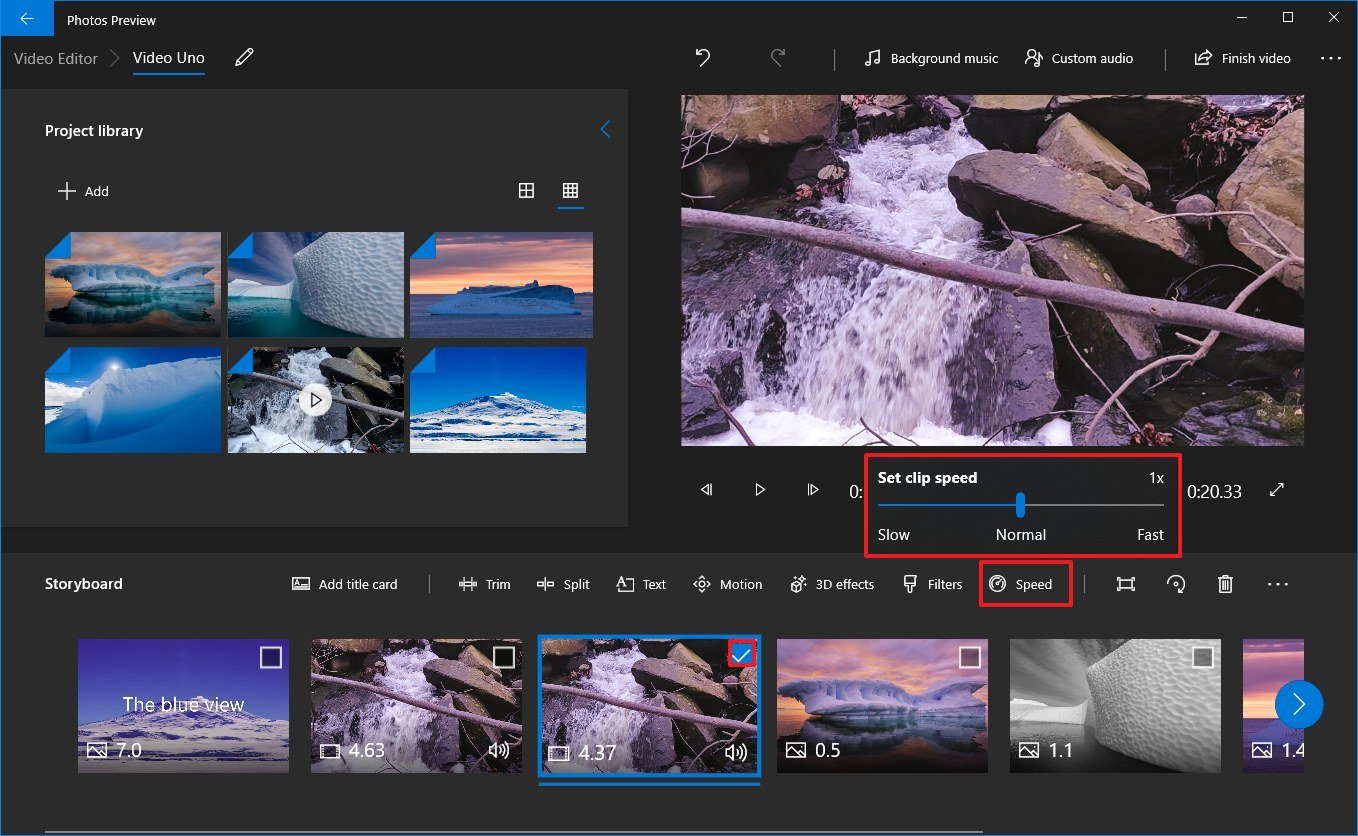
Speeding
To ho-hum down or speed up a video prune in the storyboard, use these steps:
- Under the "Storyboard" section, select the video clip.
-
Click the Speed button from the toolbar.
 Source: Windows Central
 - Use the slider to choose the speed of the prune.

Once you consummate the steps, the video will play using the speed yous selected.
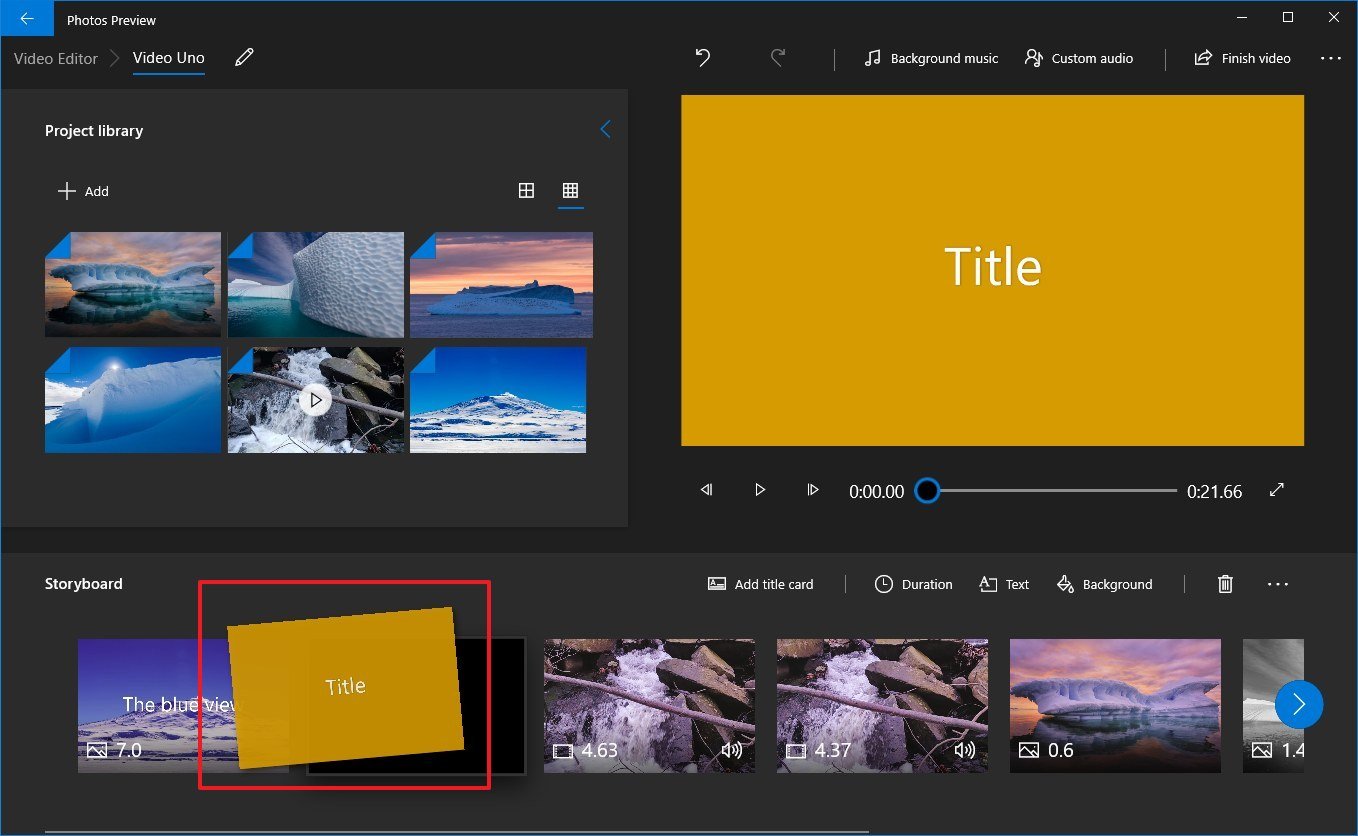
Adding title cards
While working on a video project, adding a title or custom text with a groundwork is an excellent fashion to break the video into sections or marking a change in the scene.
To add championship cards to a video projection in the Photos app, apply these steps:
-
Under the "Storyboard" section, click the Add championship carte du jour push button.
 Source: Windows Central
 - Click, hold, and elevate the carte du jour to the location you want to show it.
-
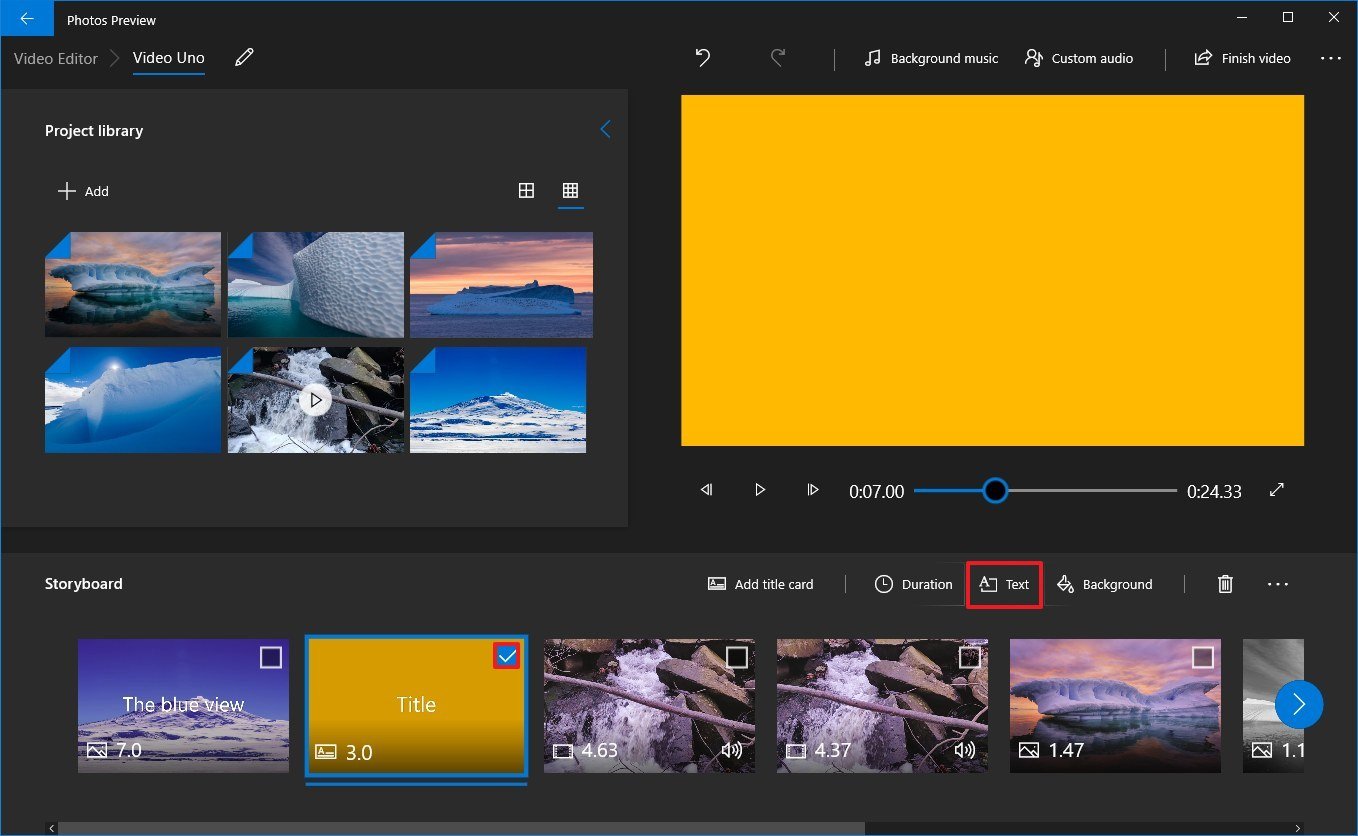
Select the championship card to focus and reveal the options.
 Source: Windows Key
 Quick tip: You lot can always right-click the carte du jour to see the available options.
-
Click the Text push button from the toolbar.
 Source: Windows Central
 -
Utilize the Text box to insert custom text.
 Source: Windows Central
 - Select the text fashion from the listing.
- Select the location using the Layout options.
- Use the controls on the left side to specify the text duration and preview the changes.
- Click the Done button.
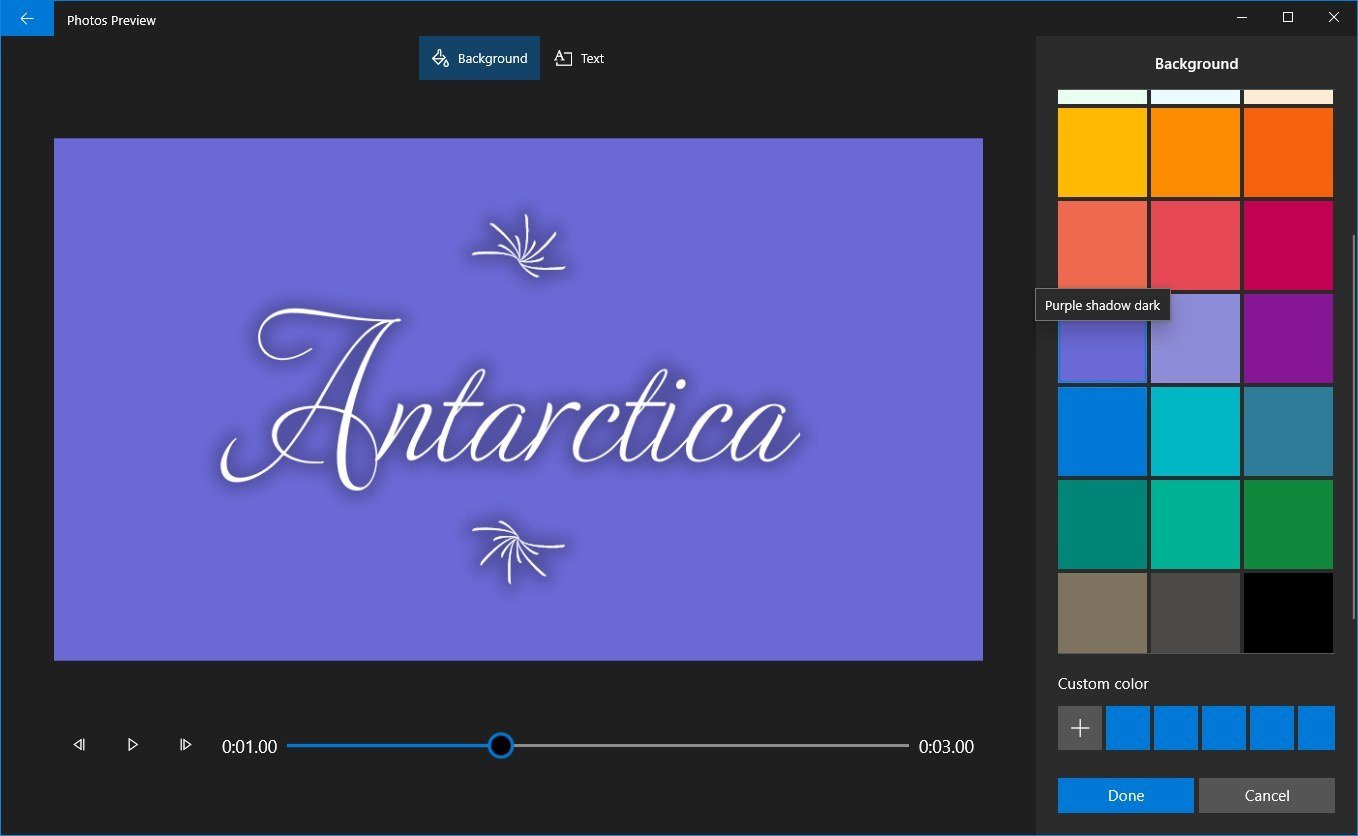
- (Optional) Click the Background option from the toolbar.
-
Select the background color.
 Source: Windows Central
 - Click the Done push button.


If you want to add together a custom image as the background, then add together the paradigm to the project, and then employ the Text selection to add together the championship or content y'all desire.
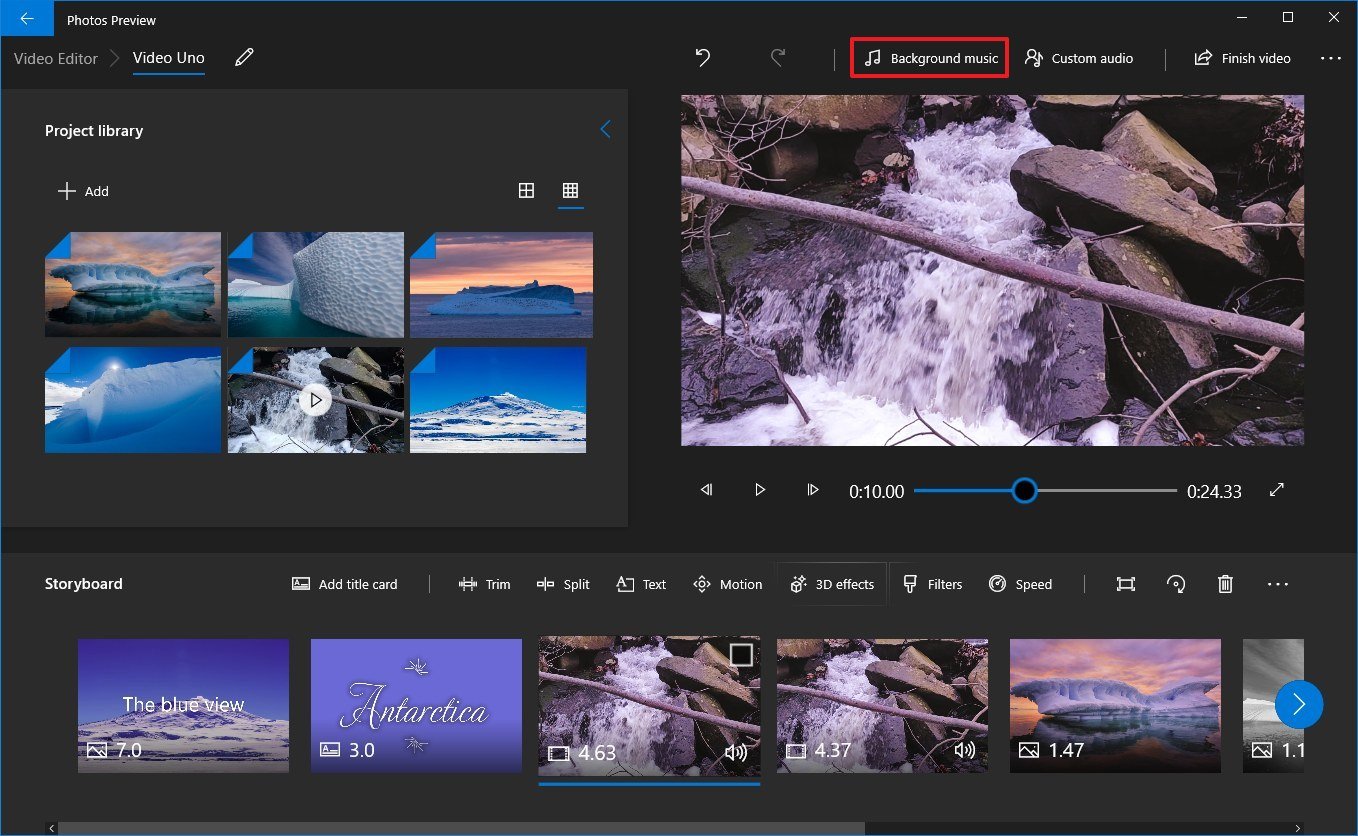
Adding audio
The Photos app editor includes the ability to insert background music and custom audio (such equally narration) to add together some life to your video.
Background music
To add background music to your project, use these steps:
-
Click the Background music push from the acme-right corner.
 Source: Windows Central
 -
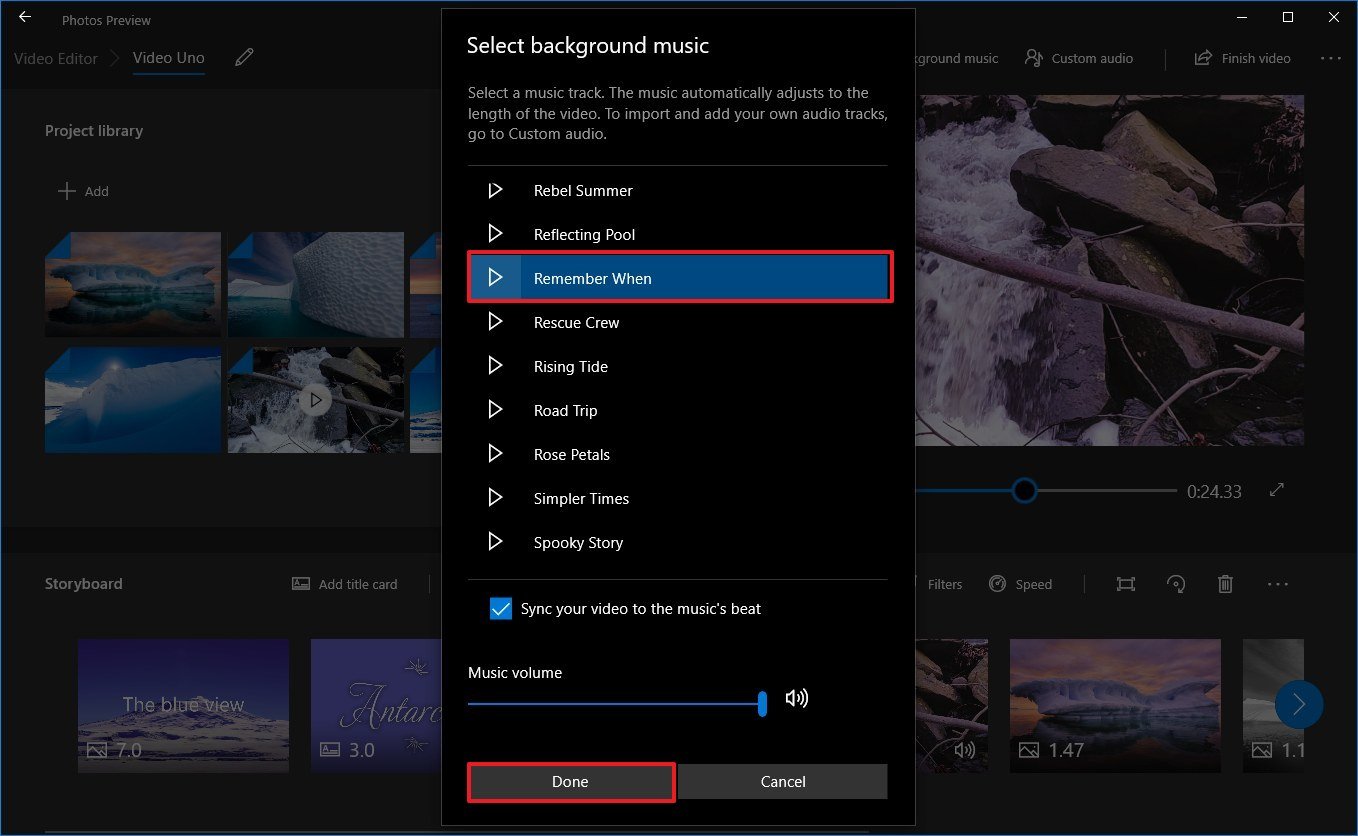
Select the soundtrack you lot desire to apply. (You can click the triangle Play push button to preview the music.)
 Source: Windows Central
 - Bank check the Sync your video to the music'southward beat option.
- Set the music volume using the slider option.
- Click the Done button.


Later on you complete the steps, the soundtrack will suit automatically to the full length of your video.
Custom audio
To add custom audio or narration to your video projection, use these steps:
-
Click the Custom audio button from the top-right corner.
 Source: Windows Central
 -
Click the Add sound file button.
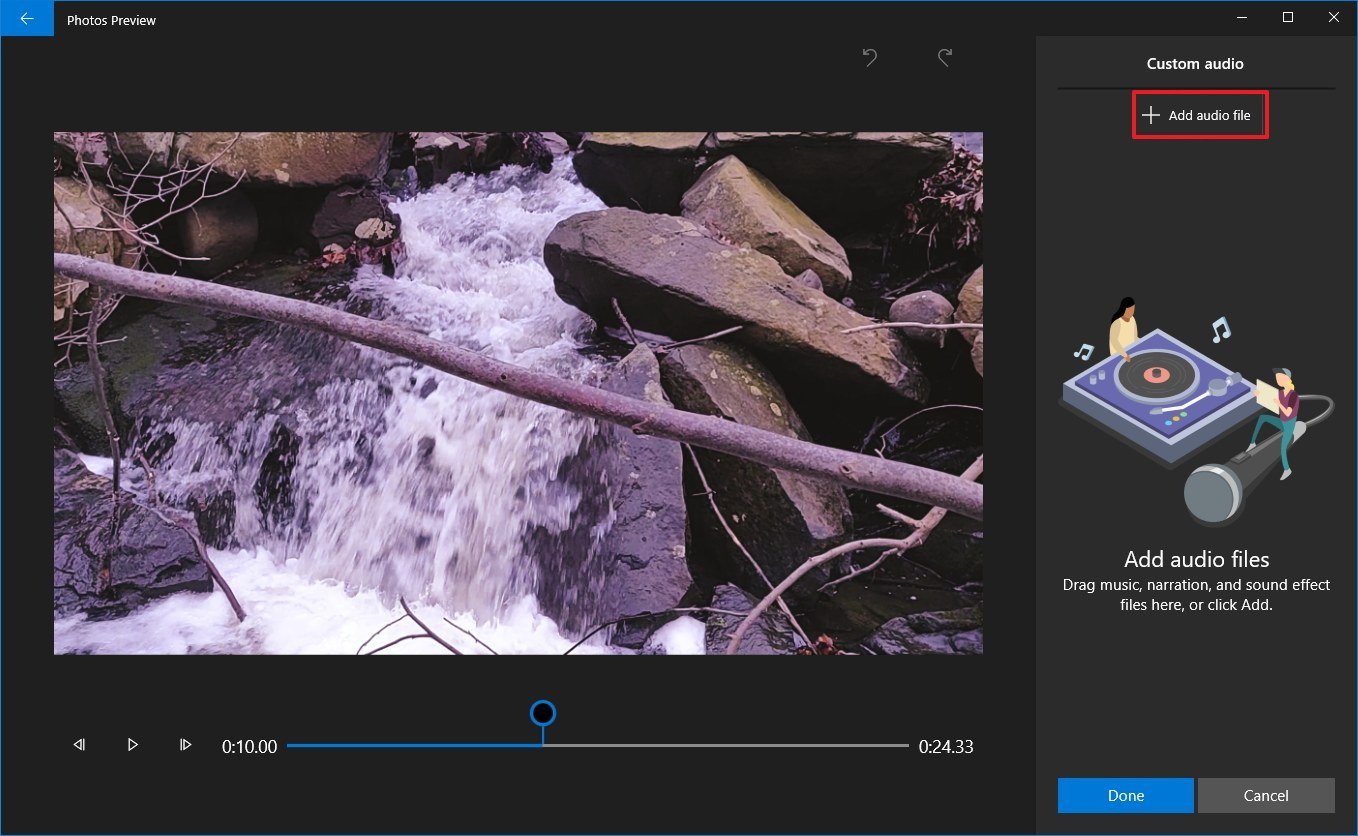 Source: Windows Central
 - Select the audio track.
-
Click the Open push button.
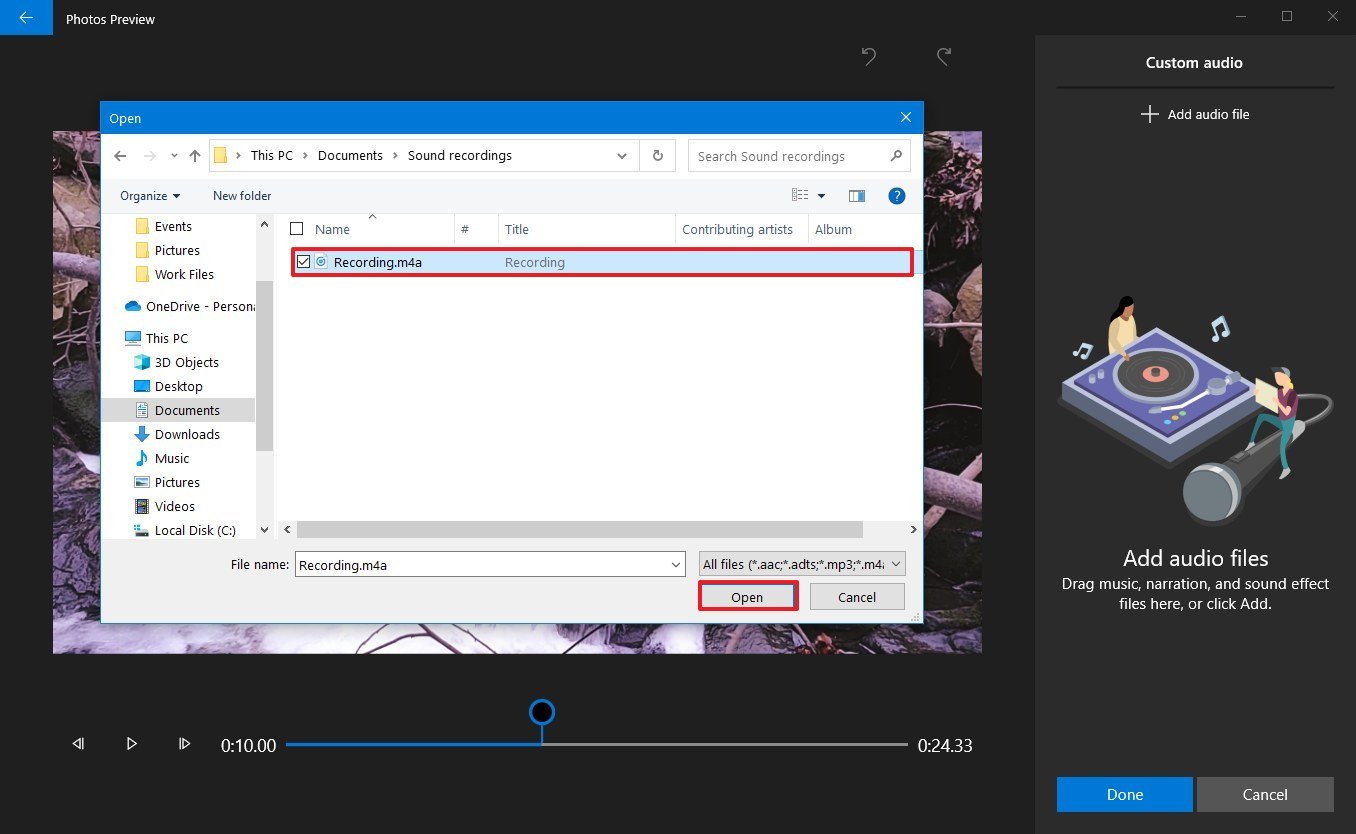 Source: Windows Primal
 -
Use the controls on the left side to specify where the audio should play.
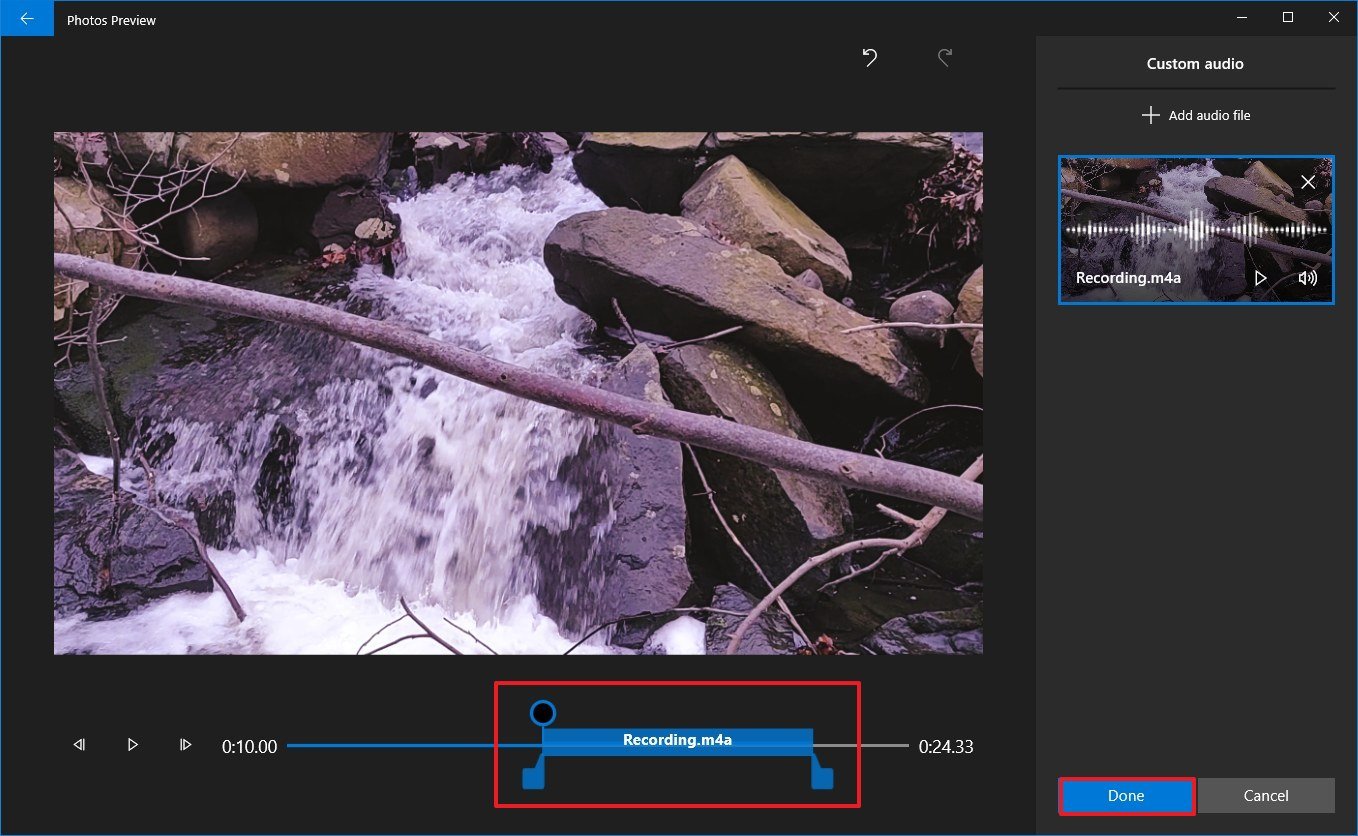 Source: Windows Primal
 - Click the Washed push.


One time you complete the steps, the narration or custom music track will apply to your project.
If you need to add narration, you lot can use the Vocalisation recorder app to create a recording that y'all can then import to the project.
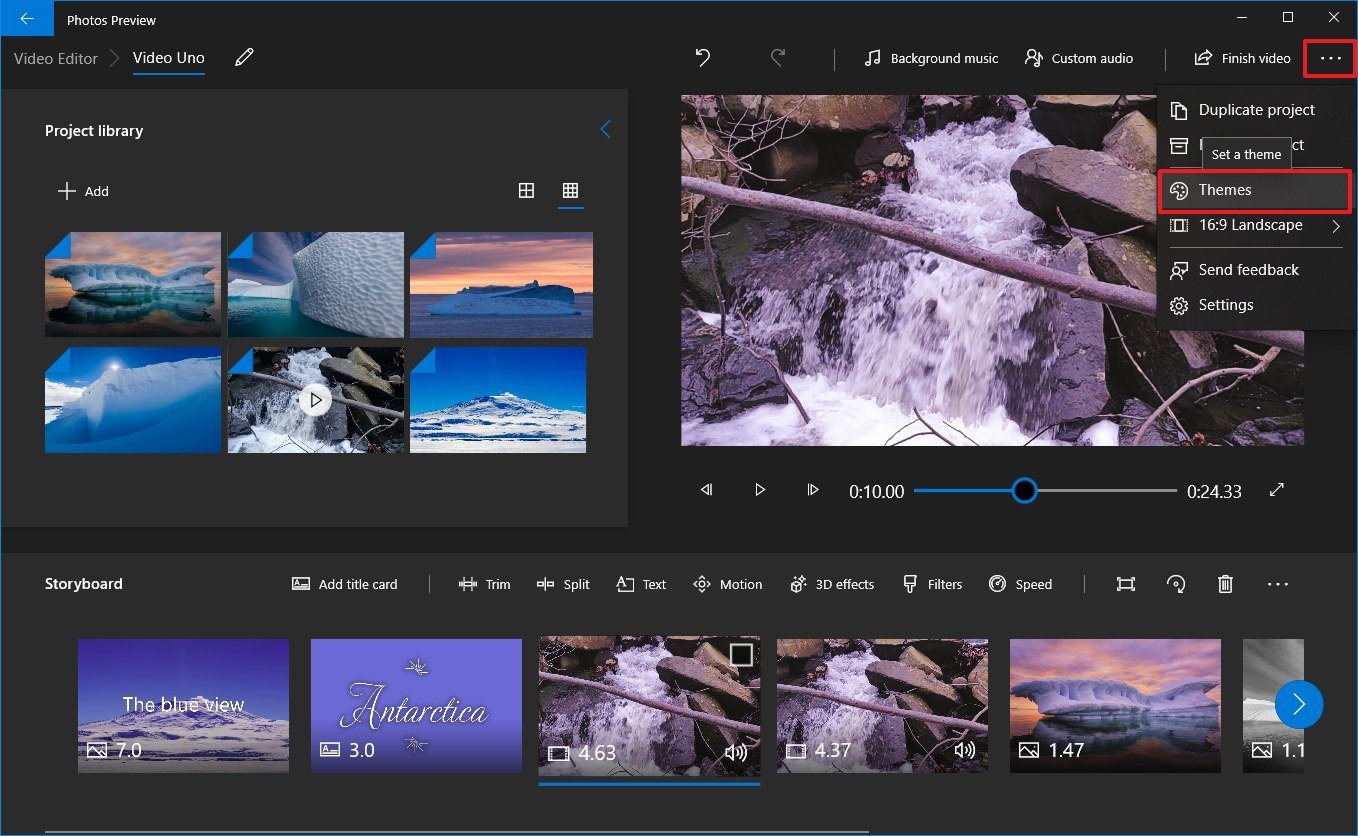
Adding theme
But like using the automatic video characteristic, yous can also add a theme to restyle the video with filters, music, and text styles.
To use a theme to a video project, utilize these steps:
- Click the card (three-dotted) button from the acme-correct corner.
-
Select the Themes option.
 Source: Windows Central
 -
Select a theme for the listing.
 Source: Windows Central
 - Click the Play push to preview the changes.
- Click the Washed push.


After you complete the steps, the new theme will apply to the unabridged video, and you tin preview it clicking the Play push in the preview section.
How to add 3D effects video projection using Photos
Mayhap ane of the virtually heady features in the Photos app is 3D special effects that you lot tin can add together to the media element.
To add 3D effects to a video project, use these steps:
- Open Photos.
- Click the Video Editor tab.
-
Select the project you want to add 3D furnishings.
 Source: Windows Central
 - Under the "Storyboard" section, select the media element.
-
Click the 3D furnishings button from the toolbar.
 Source: Windows Cardinal
 -
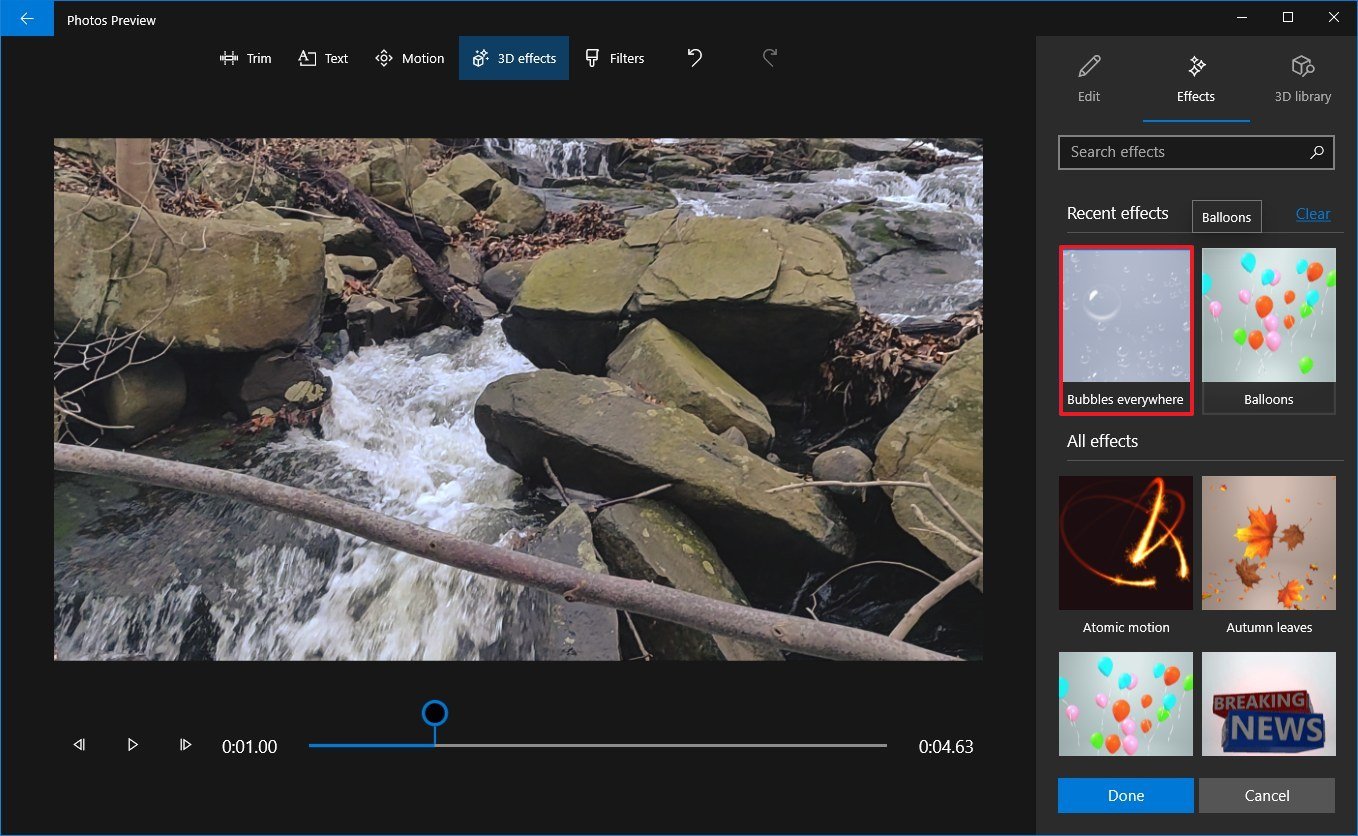
Click the Effects tab.
 Source: Windows Central
 -
Select the 3D effect into the preview on the left.
 Source: Windows Central
 - Use the controls on the left side to adjust the duration of the effect.
- Click the 3D library tab.
-
Select the library category.
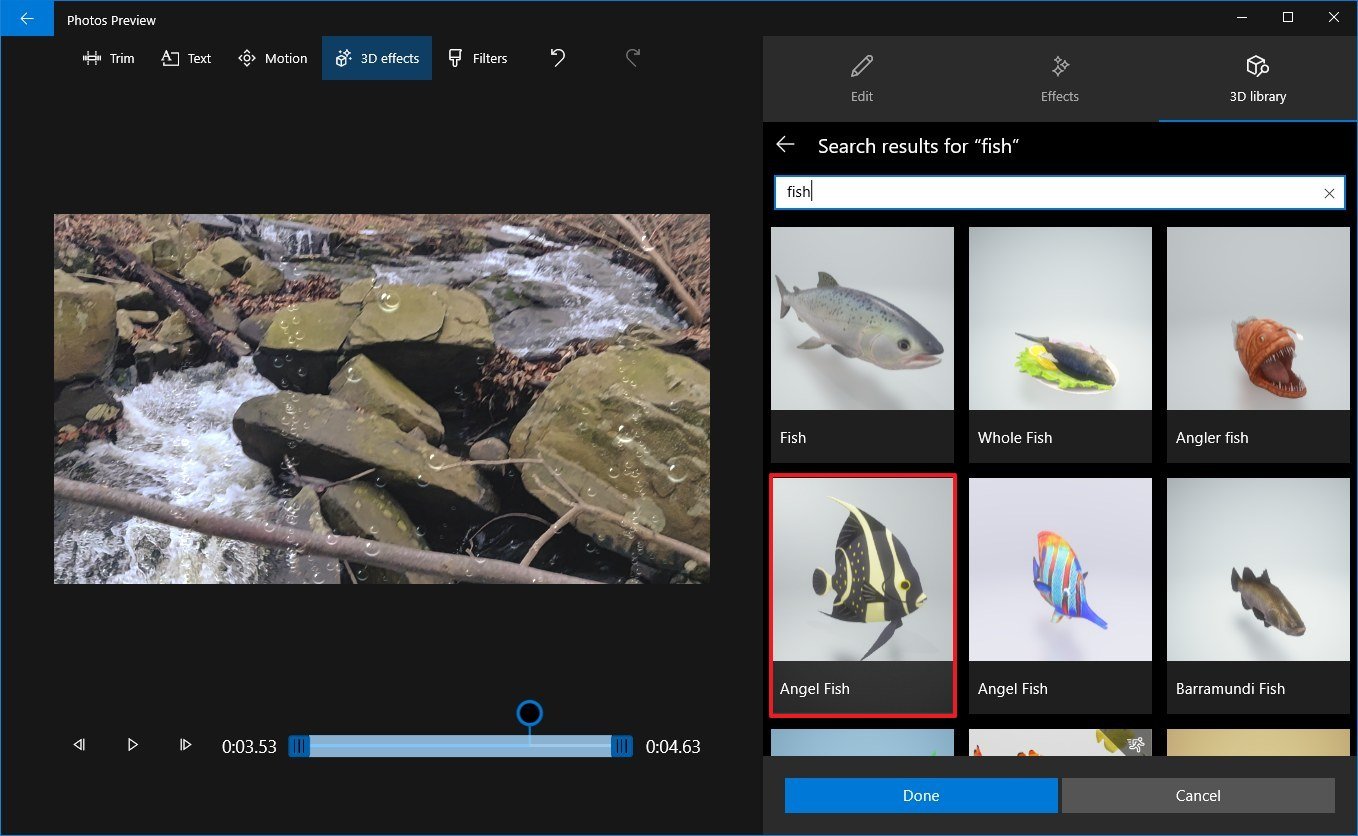 Source: Windows Central
 - Select the element to add to the video.
-
Use the controls on the left side to drag and position the element in the prune. (You tin can also rotate and calibration the upshot using the controls.)
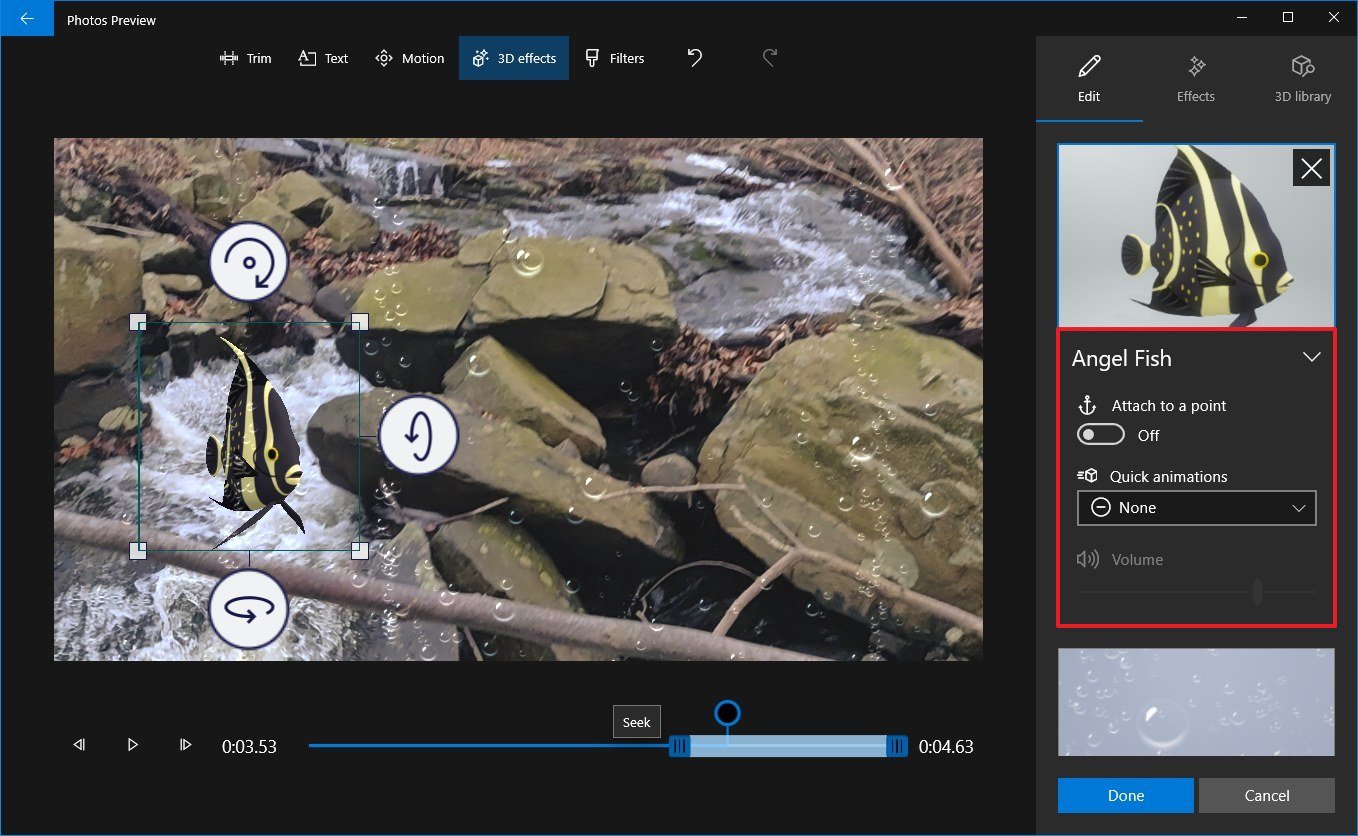 Source: Windows Central
 - Use the controls to attach the element to an object in the video clip. And then, even if the camera was moving during the recording, the 3D event volition stay in the correct identify.
- (Optional) Use the Quick animations drop-downward menu to select an animation (if applicative).
- Click the Done button.


Once y'all complete the steps, you'll end upwards with a more engaging clip using 3D furnishings.
How to backup video project using Photos
The Photos app video editor likewise allows you to backup a project and so you can use it on some other computer.
To fill-in a video project in the Photos app, use these steps:
- Open Photos.
- Click the Video Editor tab.
- Select the projection yous want to fill-in.
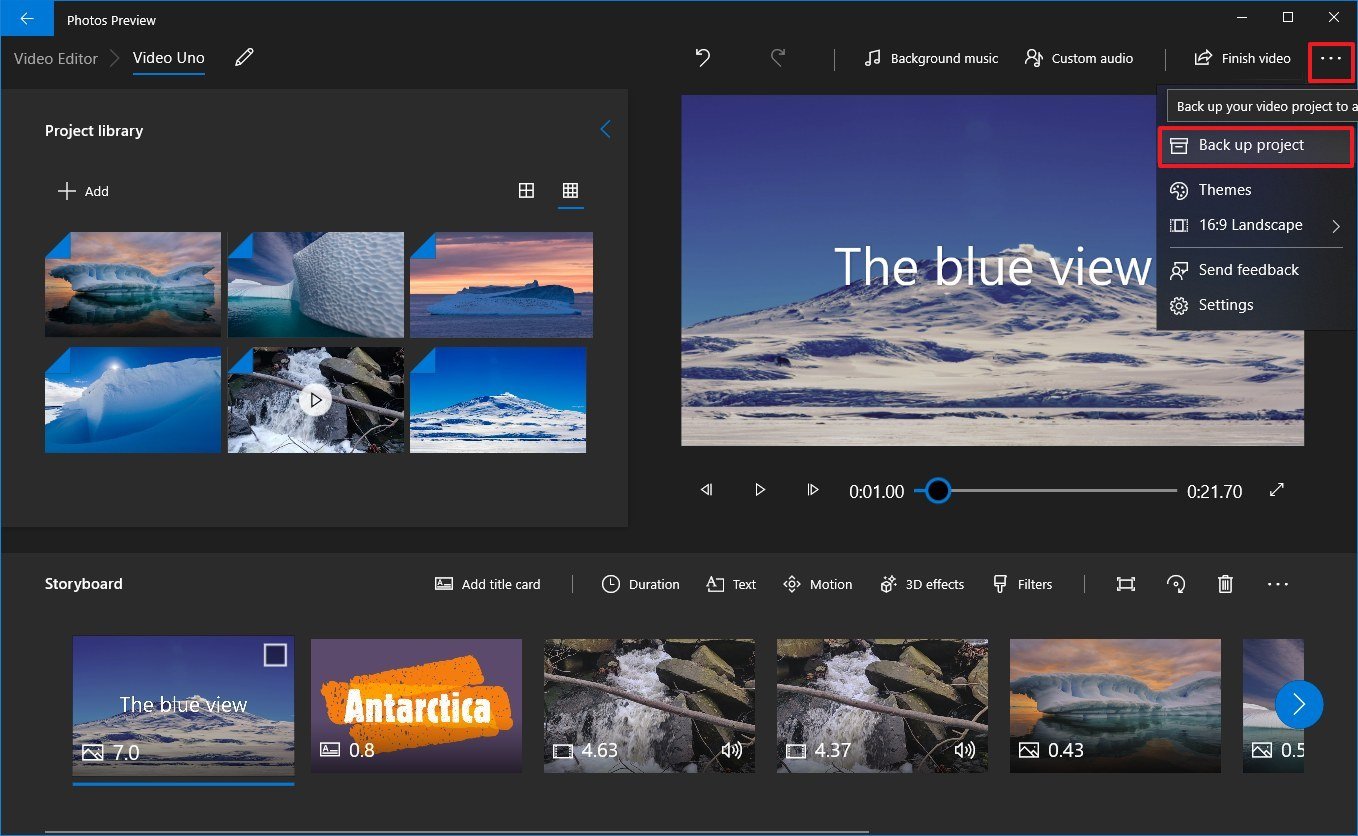
- Click the menu (three-dotted) button from the top-right corner.
-
Select the Back up project selection.
 Source: Windows Central
 Quick tip: Y'all can also employ the Duplicate project option to fork another video with similar elements to save time.
- Click the Cull backup location button.
- Select the binder location.
-
Click the Salvage button.
 Source: Windows Central
 - Click the OK button.


After you complete the steps, you'll cease up with a ".vpd" file that contains the project edits and media files that y'all can go on working in the video on another device.
More Windows 10 resources
For more helpful articles, coverage, and answers to common questions about Windows 10, visit the following resources:
- Windows 10 on Windows Fundamental – All yous need to know
- Windows 10 aid, tips, and tricks
- Windows ten forums on Windows Central

It could piece of work
Hither'due south why 'saving' Surface Neo by putting Android on it makes sense
Surface Neo was never officially canceled, but it'south also unofficially never coming. What should Microsoft do with the design? It's too pocket-size for Windows 11, and there's no Windows 10X. Would Android exist a practiced fit? It seems to exist working for Surface Duo, which is nothing more a smaller version.
Source: https://www.windowscentral.com/how-start-using-photos-video-editor-windows-10
0 Response to "How to Upload to Youtube From Photos Windows 10"
Post a Comment